|

If you would like to see a preview of the results of this lesson,
please click here. A file may be downloaded which has the graphics
and sound necessary. ScrippyMe members may download the ssc file from
their files area. 1. Please insert a
loading message and then uncheck 'use loading message'. Return here later
to recheck this box if you would like to use a loading message. Taking
these steps insures that when you do a preview you will not be bothered by the
loading message. Even if you have not inserted a loading message, each
time you do a preview, this will still show up. 2. First,
insert a background and use the graphic named springbg2.jpg. This does not
scroll. 3. Insert a 10 pixel double
frame, placed over the background. The color is #3A4A58. 4.
Insert a 4 pixel outset frame and use the color of #577085. 5.
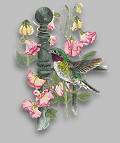
Next we will insert the main image. Insert a positioned image and set this
50 pixels from the top in the vertical area. Horizontal remains at center
and distance of 0. The graphic name is spring-main.jpg. 6.
Now we will put in another positioned image. The graphic needed here is
hummingbird-sm.gif. This goes 183 pixels from the top in the vertical area
and 65 pixels from the center in the horizontal area. 7.
Please insert a positioned container. Set the left and right edges to
80. Set the top edge to 500 and the bottom edge to 30. 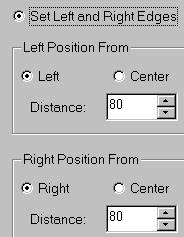 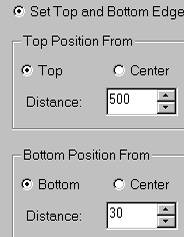
8.
Make sure that the container in #7 is still selected and then insert a
frame. This is a 10 pixel double frame, placed over the background and it
needs to have the color of #3A4A58. 9.
Make sure that the container in #7 is selected and insert a background.
Use the color #577085. 10.
Next we will insert the message area. Please make sure that your message
area is as shown in the second image below. The left margin is 90, right
margin is 90, top is 515 and the bottom is 30. The scrollbar base color is
#577085. 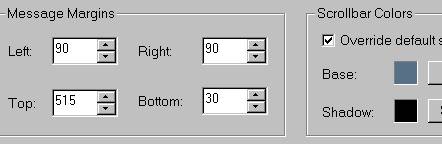

11.
Add in a ticker here as well as a sound. The midi file is
called, appropriately enough, springclean.mid. 12.
We will now add in a series of six segments of positioned containers. To
hold each segment we will put in a positioned container and set all of the edges
to 0. 13. Click on the container you
just inserted and insert another positioned container. Center the
horizontal and the distance is 200. The size here is 25. For
vertical, set this from the top at 50 and the size is 418. 14.
Now select the second container (the sub-container) and insert a
background. This is not the second container you put in from the top, but
the third one. However here, it is secondary to the main container as it
falls inside of it (under and indented to the right). The graphic is
called springbg4.jpg. It scrolls down, smooth scroll at 5 pixels per
second. 15. Select the background and
insert a positioned image. The image is named spring-frame2.gif.
This image is centered both horizontally and vertically with a distance of
0. In other words, no changes are needed here. If your positioned
image does not fall last, please move it below the background. 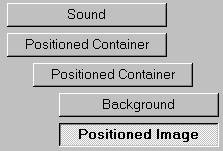
This is the first segment of positioned containers.
16.
Copy the segment of containers starting with the very first one shown in the
above image. Now select the positioned image in that segment and click on
the paste icon. When you do that, here is what will happen. Notice
that scrippy placed this copy under and even with your positioned
container? I want you to grab the selected one as shown here, and move it
over to the left as far as possible. This should be easily done. 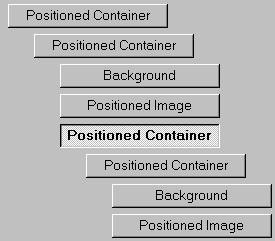
This is what you should have after you move the container
left.
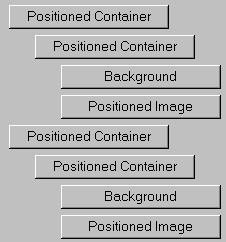
17. Now select the
sub-container of the second segment and make these changes. Change the
horizontal distance to 250 and the vertical distance to 150. Also change
the vertical size to 209. Change the positioned image to
spring-frame3.gif. 18. Again,
please paste in another segment of containers and move them over to the
left. The changes needed for the sub-container are as follows:
Horizontal distance is 300, vertical distance is 50 and the vertical size is
418. These verticals should all be 'from the top'. Make sure the
positioned image is spring-frame2.gif. 19.
Now we will duplicate each of these three segments of containers. Copy the
first one and paste it in as described up above, moving it over to the
left. The only change necessary is to add a minus sign in the horizontal
distances. For example, the first one is -200 instead of 200. Copy
and paste the second segment and change it's horizontal distance to -250.
Copy and paste the third segment and change it's horizontal distance to
-300. The minus places them on the opposite side of the center. By
using this method, these lines will always be 300 pixels from dead center no
matter how large or small the viewing area is. This is not always the
desired method, but in most cases this is a good way to do it. This
concludes the Spring lesson. If you have any problems feel free to email
me and to send me the ssc file and graphics, if different than those used here,
if you are absolutely at a loss. I will correct it and return it.
Sometimes I will merely point out where you went wrong and let you correct it. Main
Index - Tutorial Index This website and all content may be freely copied, reproduced or shared without
prior permission from the webmaster for personal use. In no way may
anything from this page or any other page associated with https://scrippyme.tripod.com/
be used for profit or gain. All graphics represented here are
originals (other than lesson pictures) and all tutorials are provided by the webmaster.
Created by Ozmee, March 2002
©Copyright Ozmee, 2002
All rights reserved.
|