|

Preview the end result.
Download the zip file with graphics, sound and ssc file here.
Note: All of the
graphics that you will need have already been prepared. However, to learn
how this was done and how to do it to other images, please click here!
Special Note: Save
your ssc file right away and then save it after you do any step just in
case. That way you won't do a lot of work and then lose it in case of
computer or program errors.
1. Let's begin by opening
up a new master scrippy. Now let's go ahead and put in our loading
message and get that out of the way. To me it is very annoying to have to
wait for it every time I want to do a preview. Click on insert, loading
message, and then when it opens up uncheck the 'use loading message'. Now
it will not bother us and you can always change it back when the lesson is over,
if you choose to!
2. The next thing we need
to do is insert a background and the one you want is the brown one here, it's
called parchment.gif. I didn't make this background and don't know who
did. The background does not scroll nor does it need any other changes.
3. Here comes a
container! Set it horizontal; centered, distance of 0 and a size of
466. Vertical is set from the top at a distance of 40 with a specified
size of 312.
4. Put in another container
and let it fall under and to the right of the first one, its a
sub-container. Use horizontal and vertical settings as before EXCEPT
make this one set from the right for horizontal and the bottom for
vertical.
5. Under that sub-container
we need to insert a background and the one you need here is water2.jpg.
This is going to scroll down and needs no other changes. This is actually
what makes the water look like it's moving.
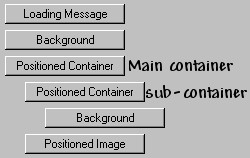
6. Next you need to insert
a positioned image. This image is even with the sub-container.
Here's a picture to help make sure it gets put in the right place. The
positioned images that go after this are also all going to be in the same
position. The image is called scenic-noclouds.jpg. Center this
horizontally, set it from the top vertically and leave it set at 0. For
transparency, please enter 40. It's called no clouds because I took them
out, the image quality was very poor.
7. Add another positioned image and the graphic you want
is called, scenic-left-waterless-side.gif. I'm sorry but I wanted to make
sure I did not get confused as to which image went where. This is the
first one that I made, lol. Set this from the left and from the top and
leave it set at 0 each.
8. Add a third positioned image and use the graphic called
scenic-top.gif. Set this centered and from the top, leave it at 0's.
9. Yet another positioned image and this one is top.jpg.
Set this centered and from the top, leave it at 0's.
10. Insert another positioned image, this one is moon.jpg.
Set it 10 pixels from the top and from the right. I tried making this move
but didn't have enough patience to work it.
11. The last positioned image you need to insert is the
lighthouse animation. It's called lh-ani.gif. For horizontal choose
center and -100. For vertical choose from the top at 60. If you
preview the stationery now you will see (hopefully if all is well), the image
with the moving water.
12. Insert a sound, its called october-seaside-in-fall.mid,
set to continuous play.
13. We need a second sound, this is for the waves.
It's called appropriately enough, ocean-wave.wav. Set for continuous play.
14. Now please insert another positioned container and
this is a 'main' container so when it falls under the last one just grab it with
the mouse and move it over to the left. For horizontal, set this centered
and a size of 506. For vertical set it 20 from the top with a size of 352.
15. Insert a double black frame of 10 pixels, check 'place
over background'. Now copy and paste this so that you have two frames just
alike! These both go under that last container you put in. This is
the frame around our main image.
16. Now we need some smoke coming from that chimney, so
for that we are going to use another positioned container. Don't you just
love those two little words? Horizontal is centered, -148 with a size of
3. That is for the width of our smoke. Vertical is 105 from the top
with a size of 50.
17. Now you insert a background under that container and
use the graphic called smoke-sm.jpg. Scroll this up and set the transparency to
80. For vertical spacing change it to 50.
18. Now go to edit/paste frame and paste the same black
frame in and make sure it sits all the way over to the left. This frame
goes around the outside of our image so it can't go under a container.
19. Well, if we want to send messages using this
stationery we need to put in a message area. Set the left at 90, the right
at 90, the top at 385, and the bottom at 15. Set the scrollbar base color
to #BDAD8C.
20. The last thing here is a ticker! Believe it or
not, that is all there was to it, lol....
CONGRATULATIONS! YOU'RE DONE!
Index - Tutorials
I hope that you have enjoyed doing this tutorial and
that all parts were easy to understand.
As always, tutorials made by Ozmee are free to
save, pass around and share with others. Tutorial created 01/23/2002 by
Ozmee. Credit goes to Pami for sharing!
|