|

How to prepare an image for use as water, in conjunction with the lesson called
SeaScape.
A different image is being used than the Seascape image as it
was done totally different than what you will most likely need to do with your
own image. And once you learn this you can do it the other way also.
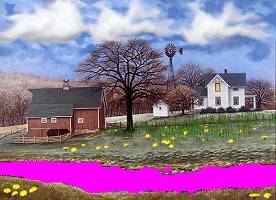
This is a scaled down image. The pink here shows where my water was.
I used the lasso tool,  and drew along the edge of the water itself. I then cut it out and pasted
it as a separate image, leaving the main image as you see it. I used pink
because it isn't in my image and it is my transparent color. Here you can
see it because I saved this as a jpg so it would show up...once you have your
water cut out and the water area is a single color, save this as a gif using the
single color as your transparency.
and drew along the edge of the water itself. I then cut it out and pasted
it as a separate image, leaving the main image as you see it. I used pink
because it isn't in my image and it is my transparent color. Here you can
see it because I saved this as a jpg so it would show up...once you have your
water cut out and the water area is a single color, save this as a gif using the
single color as your transparency.
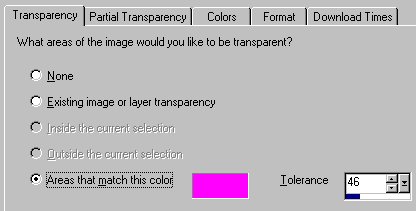
Notice that the tolerance here is set at 46. Sometimes all of your
transparent color (here pink) doesn't go away and you can raise this number to
make it all disappear. Be careful however when doing this, as often this
color may be found in other parts of your image even though you don't visualize
it. BTW, this is a good way to get holes in a graphic for a sparkling
stationery!
Now we need to work with the water image that we cut out and
pasted as a new image.

This is the water that I cut out. This is the actual image and you cannot
see the pink in it because it IS transparent. As I had pink set for
my background color, when I pasted the cut out water as a new image, it
automatically was given a pink background. All that I had to do was save
this as a gif and make sure that the pink color was set to be transparent.

If you look at the image above, you can see where I copied a portion of the real
water and pasted it all over this image. This particular image is the same
exact size as the other one. I also used 2020 to tile it. It could
be better but I'm also still learning! This is saved as a jpg file and
this is the part that you scroll under the water.gif so that it looks as if it's
moving.
That is all there is to preparing your graphic. Now, as
to the one used for SeaScape, it had problems and I couldn't get it to work like
this one. It has pieces cut out of the entire image and took some
finagling to make that one work. The waterfall stat was done the same way
as this one.
Now you need to put it all together for use. Put in a
container that is set to the same size as the main image. Make sure to set
the top so you can add a message area or else the minute you type on it your
graphics will get pulled down out of place. Now put in another container right
under that first one. Set the size of this one to be the same as the first
one. Be sure to set the top here also. The numbers you use for the
second container's top position will likely NOT be the same as the first
one.
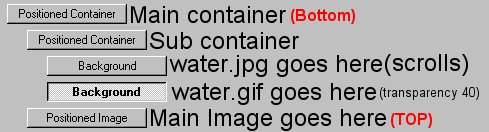
The first background shown here is the water.jpg. The
second one is the water.gif. Then the main image is on top of those and is
aligned with the sub-container, which means it really belongs under the main
positioned container. It is sitting in front because you want the water to
go under it. Scroll your water.jpg image in the natural direction of your
water. Try smooth scroll with varying numbers until you like what you
see. It's all mostly guess-work here.
For your two backgrounds, I would only put one in first and
align it up with the main image so that it fills in the hole that was left by
the transparency. Look at the main image up top. Where that pink is
showing here, will be invisible and your background water will show up, when you
get it perfectly aligned so that it fills in that empty space. Be sure to
use the center feature! Remember, adding a - to your number when the
horizontal is set to center, pushes the image to the left of center. If
you use a positive number, then it gets pushed to the right. For this
image, in my subcontainer, I used a number of -61. That means it got moved
61 pixels LEFT of the center of the container.
I tried various numbers from the top in the subcontainer until
I got my image close to filling in the hole and then I started using smaller
numbers to even it up so that the entire empty spot was filled with my
image. Once you get this in the right spot, then add in the water.gif as
the second background and just use the same numbers that you used for the
water.jpg. Set your water.gif graphic which sits on top of the water.jpg
that scrolls, to a transparency of around 40. Now please keep in mind when
I say on top, in Scrippy it's reversed. I do not mean the background that
comes first if you come down from the top of the page. Last item on is
first to show. So that is why the main image goes last, because we want it
on TOP. Ok? I know that this part is confusing, it confused me for a
while too.
This should do it, you hopefully can understand these
instructions well enough to set up your water. If not, and don't be
surprised if you can't, just go and do the Seascape lesson and you will get a
better idea of how it's set up. But keep in mind that one is not set up
exactly as this one is either. Feel free to send me an email if you get
stuck, don't waste time fretting over it.
Thanks to Pami for letting me take a peek at her water ssc
file so that I could learn how and make up these tutorials.
Lighthouse Animation
This was very simply done. Normally I'd use Axion lens
flare to do it but for some reason it would not work. So what I did was take and
choose a light yellow color and using my paintbrush I just painted in a large
enough dot to make it look as though the light had increased. I saved both
images as a psp image and imported them to the Animation Shop. That is all
there is to it.
Index - Tutorials
I hope that you have enjoyed doing this tutorial and
that all parts were easy to understand.
As always, tutorials made by Ozmee are free to
save, pass around and share with others. Tutorial created 01/23/2002 by
Ozmee.
|