|


This lesson
will show you how to make a stationery for a different
kind of kaleidoscope. It will also help you to make your own
images. This scrippy was originally created by Cybermouse
with a few small changes by myself. To see the final result, please click
here.
To download a zip file with all of the images that you will see here as
well as the ssc file included, please click here.
Making the Kaleidoscope Images First
you will need to make a main graphic in which you will create the sections of
your kaleidoscope. In your graphic editor open up a new image size 302 x 302 with a
white background. Make your
foreground and background colors both black. In PSP choose the drawing
tool and set it to be 2 pixels wide. Use single line mode. Go to 151-0 which is at
the top in the middle, click and hold down the button, bring your mouse down to the bottom
at 151-302 or over. It won't matter if you go over. Let go of your
mouse and now you have a black line. Now
go to 0-151 and draw a line across to 302. Your image should look like this one
below (of course much larger). I just put those numbers in there to show
you where 151-0 and 0-151 was. If you use PSP and look at the bottom left
of the screen you can see the numbers that show you when you are in the right
place. 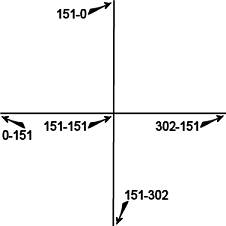
Next,
select all and then choose Selections/Modify, Contract by 2 pixels. Next
choose invert selection. Use your flood fill tool and flood fill the
outside edges. Now you have a black line all around the
graphic. 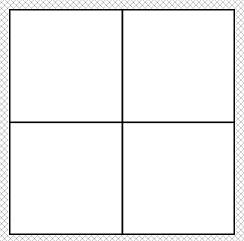
Now
use the line draw set at single line and put it at 151-0 and click and drag it
to 0-151 and release it. You now have something like this. Repeat
this until you have triangles in all of the four sections. For the second
one, put the cursor at 151-0 and drag the line to 302-151. For the bottom
left put your cursor at 0-151 and drag to 151-302. For the
last one which is the bottom right put the cursor at 302-151 and drag it to
151-302. 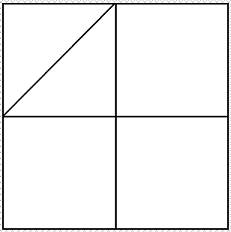
Now
you should have something like this. If you have trouble putting your
cursor on 302 try just putting it at 301. 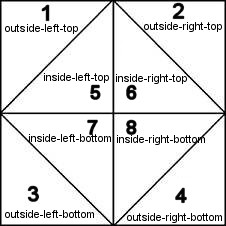
In order to make your filled in areas all the same, I
recommend using a background that you have made or go ahead and make one
now. Make sure it is a tiled background. You don't need
numbers. I have put them here to make reference to each triangle. Once
you have your background tile ready, select area 1 and expand the selected area
by two pixels. Fill this with your background tile and then copy and paste
this as a new image. It should come up with a transparent
background! Save this as a gif and name it outside-left-top. Now
select #2, expand it by 2, fill it, copy and paste it as a new image. Name
this one outside-right-top. Repeat this for #3 and name it
outside-left-bottom. Name #4 outside-right-bottom. For 5-6-7-8 do
this also one section at a time and name them inside-left-top, inside-right-top,
inside-left-bottom and inside-right-bottom. Make sure that all of these
images you have saved are 150x150. If they aren't just use the resize
feature and resave. You do not have to change them to 16m color first. Next
we need to make two smaller images using the same background tile. Open up a new
image size 62x62 with a white background. Use your selection tool set to
circle and draw a circle as large as you can to fit inside the square.
Fill this with your tile and then choose inner bevel and round. Save this
as a gif named circle and make sure that white is your background color and is
chosen as the transparent area. Open another image 62x62 and fill
it with your tile image. Go to Effects, inner bevel and use the same
setting as for the circle. Go to images, rotate and rotate this 45 degrees
left. Make sure your background is the white, if not, undo and redo it
after you change it to white. But you can actually use any color as long
as you make sure that color is used as the transparent portion when you save
your gif. Save this one also as square.gif. Here are the
images that I have made for mine shown reduced at 50%.
When I saved these gifs my background color was that as shown so
that is why it shows up here. As long as you save your image as a gif that
background color won't matter since you are saving them with transparent area
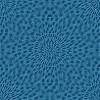
checked. Now you need to make three backgrounds. The first
one shown here is the one that goes over the larger area. For once, I
saved the directions for making one like this if anyone is interested. I
opened up a new image 200x200 in the color of my choice which is one of the
colors in my gifs, and I chose custom brush and used the one that looks like a
splatter. Using a darker color in my gifs, I put dots all over the
background. I then used a Funhouse filter called polar convergance,
default settings and applied that. I next applied FM File Tools Emboss
with the settings of -1, -1, .250, 64, 0.938, 0.938, 0.938 and edge wrap is checked.
Then 2020 was used to tile the image and I saved it as a jpg. You can do
yours anyway you'd like. For the second and third backgrounds,
don't make a busy background but rather make them pretty plain. These two
are going under your kaleidoscope and they will slide from one to the other. To
make the two backgrounds that go under the kaleidoscope, make them 300x300 or
else they will not cover all of the underneath. For the script
portion we will continue on to a second page.

|
Main Index

|
Tutorials Index
|
This website and all content may be freely copied, reproduced or shared without
prior permission from the webmaster. All graphics represented here are
originals (other than lesson pictures) and all tutorials are provided by the webmaster.
Created by Ozmee, May 2001
|