|

Page Two

Please open your Scrippy program and then choose File/new or
click on the white paper to start a new scrippy stationery. 1.
First insert a frame of 10 pixels, double style, place over the background
checked, and if you are using my images,
change the color to #0B3146 and set this as a custom color for later use. 2.
Insert a positioned container. The horizontal settings are centered, 0,
specified size of 300. Vertical settings are top, 20 and specified size of
300. This is the actual size of your kaleidoscope area. 3.
Under this container insert a top border scroll and choose one of your
background tiles OR mine which is called ksbg3.jpg. Scroll this
left. Pixels per second are 45 and pixels per move are 300. Smooth
scroll. Overlap with next object and place over background should both be
checked. Transparency 0, space between is 300 and starting position is 0. 4.
Insert another top border scroll and if using my images use ksbg5.jpg.
Scroll this left. Pixels per second are 45 and pixels per move is
300. Smooth scroll is checked. Place over background and overlap
with next object are both checked. Transparency 0, space between is 300
and starting position is 300. These two backgrounds will change from one
to the other and back again repeatedly. 5. Click on
Insert/Container/Positioned Container and insert it. This goes under the
first one and you don't have to click on it first. It should automatically
go beneath it. Both horizontal and vertical settings are centered and
zero, no changes should be necessary. Same as largest image should be
checked for both so this is something you need to change. 6.
Insert a top border scroll and choose your circle or use mine called
circle.gif. This is set to scroll left, 5 pixels per second and 62 pixels
per move. Smooth scroll. Overlap with next object and place over
background should be checked. Transparency is 0. Space between is
62. Starting position is 0. 7. Insert a second top
border scroll and choose square.gif. Scroll is left, 5 pixels per second
and 62 pixels per move. Overlap with next object and place over background
are checked. Transparency 0. Space between is 62 and starting
position is 62. As 62 is the width of the images in question that is why
this number is used. 8. Click on the second positioned
container and insert another one. Horizontal is left, 0 and size of
150. Vertical is top, 0 and size of 150. 9. Insert a
background and use the graphic inside-left-top.gif. Scroll this up+left,
smooth scroll. Pixels per second is 50 and pixels per move is 1.
Auto size image to window: Set this to tile. Under Advanced options
check layer with other objects. Everything under that is zero. 10.
Insert a second background and use the graphic outside-left-top.gif.
Scroll this down+right and everything else is the same as on #9. 11.
Click on the second positioned container once more and insert another positioned
container. Horizontal is left, 0 and size of 150. Vertical is
bottom, 0 and size of 150. 12. Insert a background and use
the graphic inside-left-bottom.gif. Scroll this one down+left and all
other settings are as in #9. 13. Insert a second background
and use the graphic outside-left-bottom. Scroll this one up+right.
Everything else is set as in #9. 14. Click on the second positioned container and again insert another one. The horizontal settings
are right, 0 and size of 150. Vertical is top, 0 and size of 150. 15.
Under this container we will insert two more backgrounds. In the first one
use the graphic called inside-right-top and scroll this up+right. Make
sure the rest of the settings are the same as in #9. For the second
background use the graphic called outside-right-top and scroll this
down+left. Set everything else as in #9. 16. We need
to insert one more positioned container under the first one. Set this
right, 0 and size of 150 for horizontal. Set this bottom, 0 and 150 for
the vertical. 17. Insert two more backgrounds. For
the first one, use inside-right-bottom. Scroll this one down+right and all
other settings as in #9. 18. The second background uses the
graphic called outside-right-bottom and it is scrolled up+left. All other
settings as in #9. 19. Preview your stationery and make
sure that the kaleidoscope works as it should and that the two backgrounds and
the two small images change as they should. Here is an image of what you
should have at this point. 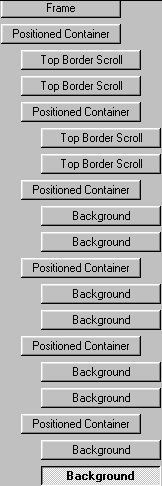
20.
Insert a frame and make sure that this is all the way over to the left margin of
your master scrippy. Groove and 4 pixels, same color as before. 21.
Now insert a background and make sure that this is all the way over to the left
margin also. Use the graphic ksbg2.jpg. This is the main background
that is outside of your kaleidoscope. 22. Insert sound, a
ticker and a loading message! 23. Lastly, insert a
positioned container all the way over to the left margin. Set left and
right margins to 80 each. Set the top at 350 and the bottom at 50.
Insert a frame, 4 pixels and inset and use the same dark color as before.
Now insert a background. Here I used ksbg3.jpg. 24.
Insert a message area and make sure that it is placed to the left and not under
the previous container. The right and left margins should be set at
90. The top margin is 365 and the bottom margin is 60. This ensures
that your message, although it will show up inside of the box we made, will be
an expanding message. 25. Next insert your sound and use
the file faq.mid. Set it to continuous play. CONGRATULATIONS!
YOU'RE DONE!
|
Main Index

|
Tutorials Index

|
This website and all content may be freely copied, reproduced or shared without
prior permission from the webmaster. All graphics represented here are
originals (other than lesson pictures) and all tutorials are provided by the webmaster.
Created by Ozmee, May 2001
Updated 1-29-2002
|
