|
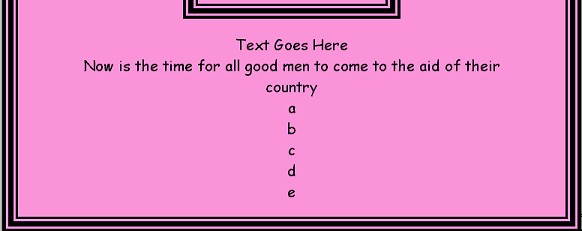
Understanding Positioned Containers A positioned container is nothing more than an empty box in the beginning. It is invisible because it is empty. Once an item is placed inside of it, sometimes you are able to see it, but the easiest way to see the entire positioned container is by inserting a colored background. There is a complete stationery for you to look at if you'd like to see what you will end up making here. Click here. Scroll down to the middle and click on the first bunny you see and save this to your hard drive. Then when I say browse for the bunny, you'll know right where it is! Open up your scrippy program and click on new. Save this as pc-lesson1. Go to insert - container - positioned container. You do not need to change any settings. Click on the positioned container and then click on insert - background. On the right now is a little spot where you can click to choose 'use the selected color'. By clicking the set color button, you can choose the color you'd like to place inside of the container. Go ahead and choose #FA93D8. Please click on preview and look at the positioned container and it's content of a background. You see a 200x200 pixel colored box in the middle of your scrippy page. If you remove the background, the box will still be there, only it will become invisible again. Go and delete the background. Now it is again invisible. Click on edit and undo. That undoes the last action and if you have more than one action it will undo that also. Now again you can see the positioned container. Since we did not change any of the settings, this box is squarely in the center of the screen. If you look at this in large preview, you will see that this is so. When you are looking at the small preview, you can still tell it is in dead center. Click on positioned container over on the left and that takes you back to the settings for that container. Let's talk about the two areas so that you can understand what they are and what action each item performs.
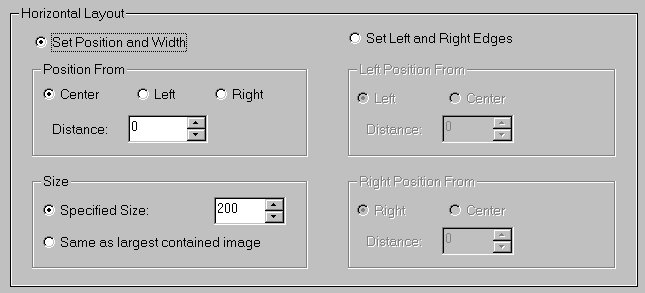
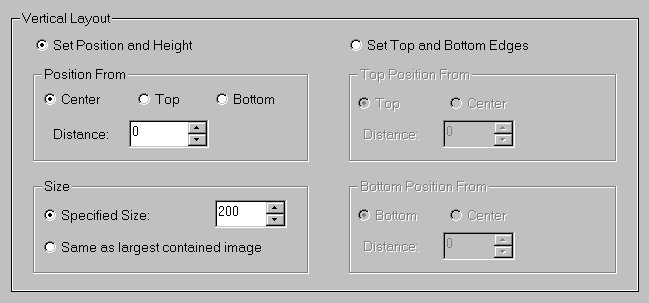
As you can see, this is the horizontal layout. Horizontal handles from left to right, or across the screen. The default settings for this are as you see them here. Center is always selected. Clicking on left sits the container toward the left side of the scrippy stationery. Distance simply means how far from the left do you want the container to be, if you have chosen left. If you choose right, it is how far from the right do you want it to be. That means, if we put a 10 in there, that this container would start at the 10th pixel from the left or the right as we chose. Center is used a little differently. Pretend that your scrippy is 600 pixels wide. Where would dead center be? Does it even matter? Sometimes it does. Go to insert and put in the item called options. Now set the margins both to 600. Did the position of your colored box change any or is it in the same place? Most likely it is in the same place. But, if you want that box to be left of the center you would put in the distance box a minus sign. Type in -200 and then look at where that box moved to. It moved left! If you type in 200 in this box, the container holding your colored background will move to the right. Sometimes you might need to have an item so many pixels from the center and the purpose for that is to keep it in that spot no matter if the stationery is viewed at a small resolution or a large one. Specified size is used in different ways. There is also the option of 'same as largest contained image'. Most of the time you can check the second box and everything will work just fine. Now you wonder when would I not want to use that second box, right? Say that you don't feel up to framing your main image or any image, and you'd like to frame it inside of scrippy. Let's pretend that we have an image which is 200 x 200. And you'd like to have that image framed by a double frame of 10 pixels. To do this, we need to increase the size of the container. Go to your scrippy and make sure it is set at center again. Now change the size in both the horizontal and the vertical to read 220. Set your distance back to 0 to re-center it. Click on the positioned container again and then go to insert - positioned object - positioned image. This will most likely be placed above your background. It needs to be on top of the background and by on top I mean at the bottom below the background but evenly aligned with it. So move it underneath the background now.
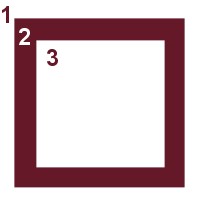
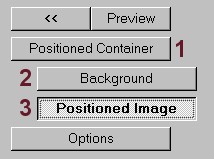
You must understand that the reference to top and bottom within Scrippy is misleading. Although in this image the positioned container is at the 'top' of our screen, on our stationery it is considered to be at the bottom. This is because every item you insert which goes underneath it such as the background and the positioned image are on top of each other. The positioned image is on 'top' of the background that you inserted first. If you put the background on the bottom here (which is really the top at this time), the image would not be able to be seen because it would be covered up by the next layer, which is the background. So every time we add something new, it will go on top of our layers however it will be on the bottom of the stack as far as the master scrippy is concerned. It is just like working backwards. This is why sometimes you are asked to put certain items in certain places and when you do not, you cannot figure out why something doesn't show up properly.
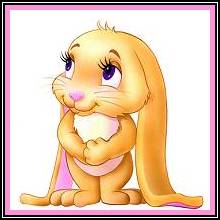
Ok, if you have that part understood and only if, go back to your scrippy and click on that positioned image and browse for the image I named bunny.jpg. Why? Because it IS a bunny. It has been resized so that it is 200x200 pixels exactly.
Choose this image so it shows up inside of your container. It has a white background and even though the previous background is pink, because this is the same size minus 20 pixels, you will see now that this image is framed by the pink background which we chose. The only reason it is centered evenly is because we increased the container size from 200 to 220. Why do we increase it by 20 when the frame is only 10 pixels wide? There are two sides here, horizontally and vertically, left and right, and top and bottom. So 10 pixels is the width for each side. Therefore you need 20 extra pixels on both horizontal and vertical. No, you would not need 40 because there are only two sizing areas, one for each 'type' horizontal or vertical. Got that?
Now if you just wanted that pink background as is to use as your frame, then this part would be done. Consider that instead of using the pink background color, we could have put in a gold background and scrolled it at fast speed. Then it would be a really nice border! Now then you have conquered your first positioned container. It was not hard at all, was it? Alright, so it isn't whipped yet! There are still a few more things to do with it. Just to see what would happen, let us go back and click on our positioned container, then go to insert - frame. Choose a frame size of 10 pixels. It doesn't say pixels but that is what all of this is figured in. Change the color to black. It should be set on groove as the default style of the frame. Take a look at what you have now. The pink has totally disappeared. That is because it is only 10 pixels wide and we covered it up with a 10 pixel wide black frame. But, we do not want to cover the pink up entirely. You can change that 10 pixels to 5 pixels and see what happens. Now you have an outside border of black which is 5 pixels wide and an inside frame of pink which is 5 pixels wide. Of course, the pink isn't really a frame, but it is serving the same purpose as a frame, isn't it? Go back to the frame, which by the way is probably sitting right under your positioned container and this is ok, change that style to say double, leave it set at 5 pixels and take another look. Now you have two smaller black lines where you did have one large black line. Interesting. Now go back and check that part that says 'place over background, and as well change the size back to 10. See how it changes once again? Here are the different looks.
Now if we had left the pixels at 5 and clicked on place over background, here is how that would have looked.
For now let's leave the frame set at 10 pixels, double style and place over background checked. Now then, we look at this and think that the frame isn't big enough. We want to add yet another frame inside of our container to make a nicer framed effect. To do that we need to do what? We need to add another 20 pixels to our horizontal and vertical widths. Please do that now. Change them to 240 instead of 220. If you look at it now, there's a lot more pink showing
between the two black lines and the bunny image isn't there? We
just made some room for our next frame. Go and click on edit, then
copy frame. Click back down on the positioned container and then
click the little icon that represents paste.
Ok. Now you have a glimmer of an idea about how using a frame can change the appearance of an image that has not been framed. For people who do not utilize graphic programs, this is a definite plus. Consider that you can use any background instead of the pink color. It would make a big difference. We will talk about the invisible frames at a later time and date, as well as the other types of framing styles. But for now, let us turn back to our stationery. You should save this periodically so you do not have to repeat it over, but even if you did, it would not hurt a thing and would just reinforce what you have just learned. Now then, we have a blank white screen with a framed bunny smack dab in the center. There is an awful lot of wasted space here! Let's move the bunny, frames and all up closer to the top. By the way, I failed to mention that both of those frames are probably sitting next to each other just under the positioned container. This is just fine! Go and click on your positioned container and down in the vertical section, please click on 'top'.
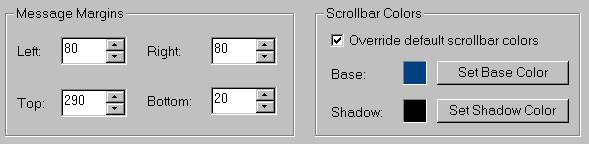
For the distance, please enter 30. We have already changed the size to 240 so that is just fine. This snapshot was taken before the sample was changed so do not pay any attention to the 200 shown here. Now the main image is 30 pixels from the top and it is still in the middle of our stationery. The reason for this is that we left it centered in the horizontal section. Scroll back up to see this or look at your scrippy master. Still this looks a little blank and plain doesn't it? We need to jazz it up a little. Let's insert another frame, you just knew that was coming I'll bet. As we already have that 10 pixel double frame with place over background checked, copied into our clipboard we don't have to copy it again. Click on the options which sit at the very bottom of the master scrippy and then click on the paste icon once again. The frame was pasted below the options and on preview you see that frame goes all around the outside of the entire stationery. Click on options again and paste in another frame. Once you have done that, preview your stationery. Now the frames look too close to our main image, don't they? Let's change the vertical distance from 30 to 50 by clicking on the positioned container. At this point in your own creation process is when you will need to decide when is too close or far enough. But we will use 50 for this one. Have you noticed that every time you go to preview your stat you have to look at the loading message? We have not even inserted one yet, hmmm Let's take care of that by inserting a loading message. Go to insert - loading message. When it shows up on the master scrippy go and click on it and uncheck where it says 'use a loading message'. Now we won't have to look at that unless we later decide we want a loading message. Notice that the loading message feature was placed above your options? It does not matter where that sits at. Later on when you are working on a stat with a lot of containers, you could use the loading message feature to separate them in order to help keep everything straight as to what goes where. This is a limited fix but it does help some. Now if you do a preview you will not see any loading message. Next we need a text area so that we can use this to write to somebody with. A stationery without a text area is a waste of time unless you just want to show something off. This is merely my own opinion, naturally. Now, if you recall, the bunny is 200 pixels high and we made our container 240 because of the two frames, right? We placed this 240 pixel container 50 pixels away from the top. So we are going to use 290 as our starting point for the top margin of our text area. Go to insert - message area and change the top margin to 290, darken in the text there and center it by clicking the centering icon on the upper right. Then do a preview. Well! Was that a lucky guess or what! It was - or what! We did not guess because we knew exactly how much space we needed due to the placement of our positioned container and it's size. This is how you determine the starting position of your top text area. Now we need to set the side and bottom margins. As this is a very simple stationery, we will not worry about the text expanding because it will expand. Set your left and right text margins to 80 and then set the bottom text margin to 20.
Have you saved your lesson lately?
At this point, you have a very basic stationery and all one needs to do is add the sound and a ticker and recheck the loading message if one is desired. You can save this again and go to file/export stationery and save it as pc-lesson1. OR, you can stick around to learn another container. This will be called pc-lesson1a. When you send this stationery in, if you put 1a on there it will alert me that you have continued on to this part. If you wish to send it in without the second part, leave the a off. You can always return and do this part later, but it is a very short part. I'd like to add another framed area around that bunny because it's so plain looking. Now, do you know how to go about doing that? Well, yeah, we could do it the same way we did it before, by increasing the container size and adding one more frame. Sure, but that is NOT how I want to do mine. Go click on options, that is so that what we are about to insert doesn't go below your container, and then go to insert - container - positioned container. For this container, set the sizes to 290. Set the top distance to 50. If you click on this positioned container, and then click on the paste icon, you will insert another black frame of 10 pixels, double, placed over the background, because you copied it earlier. Of course, if you have used your copy feature somewhere else on your computer this won't work. You will need to go click on one of the other frames and go back to edit/copy frame, or you can just insert a frame after clicking on the new container and set it like we did the other ones. Oops! On preview our frame doesn't look too good! Our text area is being overlapped by the bunny image! Increase the text top margin by 50 and make it 340. Now it's under the framed image once more. Now how do we figure out the top settings for the two containers? Well, we increased the second container size by 50 and we dropped it down 50 from the top. But since we did that, the first container which holds the bunny, is now too high. So we need to know how much further down to move the first container. Again, 50 is the width for two sides, so 50 divided by 2 = 25. Add another 25 pixels to the top margin for the first container which makes it 75 pixels from the top, found in the vertical section. Our second container needs to stay at 50 so it has an even space all around the main image. Now click on the second positioned container again and paste the frame to it one more time. Do a preview and see how the frame looks now.
You now have two positioned containers and six frames, one image, one colored background. Now, since we did not include a background outside of our frame, the background in this stationery is white (in some previews the background is showing up as pink already). Let's add in a background. Click on insert background and most likely it will be put under one of the containers. Grab it with your mouse, and move it up above at the very top of the master scrippy. To grab with your mouse, left click on the feature in question, move it to where you want it and then let go of the mouse button. Now you can choose a color to use for your background, but of course it cannot be black since our frames are already black. It would look very strange if you did choose black and you went to all the trouble of adding them in already, lol...I chose the pink as it matches what is already in our stationery. Now is the time to add the sound and ticker, if you have not already done so. It does not matter where in the scrippy master these items are placed. Save this as pc-lesson1a by going to File / Save as. This part saves this as an ssc file. If you do not have a directory for your ssc files, I recommend that you make one solely for them. Go to File - Export Stationery and make sure you save it in your stationery directory on your c drive. The location is c:/program files/common files/microsoft shared/stationery. Remember to name it pc-lesson1a and you do not have to add on the htm or html as the computer knows that this is an htm file. It does not matter if you use htm or html, either will work. The only time you might have to use html is at some websites where you may want to place your personal web page. Some of the web providers require the file to be named html. But for our purposes here, it doesn't matter which one you use because this is only going on your own system. It will work on anyone else's system as well. This is the end of Positioned Containers Lesson 1 & 1a. ©Ozmee, 2002, all rights reserved. |