|

Another Scrippy tutorial by Ozmee

Click here to
preview the end result of this tutorial. And click here to
download the graphics and sound files.
1. Please
insert a loading message and uncheck it to turn it off
temporarily. Remember to come back later and recheck it if you'd
like to use it.
2. Open
Scrippy and click on the new icon. Save this as
tulips2-lesson-yourname.ssc into your favorite ssc directory.
3. Insert
a background and use the graphic called tulips2bg1.jpg.
4. Insert
a positioned container and set all of the edges to 25.
5. Now
insert a background called tulips2bg3.jpg.
6. Now we
need another positioned container. Set the left and right edges
to 25 and the top and bottom edges to 35. This is the second
main container and not a sub-container.
7. Into
this container we will insert two left containers. Set the size
for both of these at 5. Now insert a background called
tulips2-v1.jpg.
8. We need
to insert another main container. We cannot copy and paste these
as they are holding the named containers (left, right, top,
bottom). Set the left and right edges to 25 and the top and
bottom edges to 35.
9. Insert
into this container, two right containers and set their sizes at
5. Under each of these right containers, insert a background and
use the same as before, tulips2-v1.jpg.
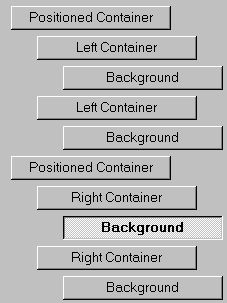
This is how these segments should look on your computer.
10. Next
we will need another positioned container into which we will put our
top containers. Set the left and right edges to 35 and the top
and bottom edges to 25.
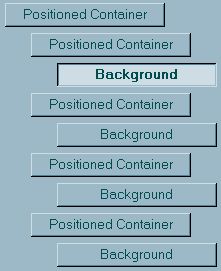
11. Now
insert two top containers, set their sizes at 5 and then put in a
background under each one called tulips2-h1.jpg. Your positioned
container, top containers and backgrounds should look like the above
image.
12. Insert
another positioned container (main as before) and set it's right and
left edges to 35, top and bottom edges to 25. Insert two bottom
containers and set the size to 5 for each. Again, insert a
background under each one and use the graphic tulips2-h1.jpg.
13. Insert
a positioned container (main). Set the left and right edges to
150 and the top and bottom edges to 75. Under this container,
insert a grooved frame of 6 pixels using the color #F6A2A2. Now
add a background to this container and use the graphic called
tulips2bg1.jpg.
14. Let's
insert a positioned image. Choose tulips2-square2.jpg. Set this
image from the left and from the top at 0 distance. This
positioned image and the ones to come below are not under this last
container. They are placed over at the left margin outside of
any container.
15. Copy
that positioned image! Paste it three more times. Change
one of the squares to right and top, another one to left and bottom
and the last one to right and bottom. These are the little
squares that go at the four corners of the stationery. If you
are using your own graphics, you may change the size of these squares
without fear.
16. Now we
will put in the main image. Insert a positioned image and choose
tulips2-main2.jpg. This is centered at a distance of 0 and set from
the top at a distance of 100.
17. Our
message area goes next. Set the left and right margins to 160,
the top margin is 425, and the bottom margin is 85. The
scrollbar color is #9B5955.
18. Add a
ticker and then a sound. The sound used in this stationery is
called FmFloren.mid. It is set for continuous play and the sound
volume is not changed.
19. Next,
we are going to do another series of segments of containers.
First insert a positioned container and set all of it's edges to
0. Under that insert a sub-container. This is centered at
250 with a width of 4. Vertical is set from the top at 120 with
a height of 300. Under this container insert a background and
use the image named tulips2-round.jpg. This is set to scroll up
and right, smooth scroll at 10 pixels per second.
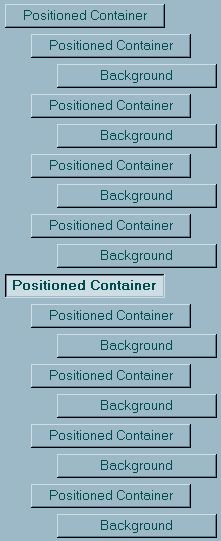
20. Click
on that sub-container and copy it. Now click on the
sub-container's background and click the paste icon. Drag the
pasted sub-container over even with the first sub-container.
Here is an image to show you how these are going to be
positioned. For each one of these sub-containers, the horizontal
increases by 10 and the vertical increases by 15. For the second
subcontainer, set the horizontal distance to 260. Set the
vertical distance to 135. These four sub-container's backgrounds
will all scroll the same way, so there is no need to change anything
but the distances. For sub-container #3, set horizontal to 270
and vertical to 150. For sub-container #4 set the horizontal to
280 and the vertical to 165.
And for each
sub-container the vertical size will also change. It will
decrease each time by 25. #1 is 300, #2 is 275, #3 is 250 and #4
is 225. As you can see, they go from large to small, then from
small to large for the next segment.
21. Now as in the image shown
right above, click on the very first container, the main container
that holds the four sub-containers and their images, and copy this
segment. Click now on the very last background and choose the
paste icon. Your next segment is now under the background, so
grab it with your mouse and move it all the way over to the left as
far as it will go and drop it there.
22. We need to make some changes
in this segment. The backgrounds will now all scroll up and
left. For the horizontal and vertical distances, a few things
are different. The horizontal distances continue to increase by
10 pixels each sub-container, but the vertical distances now will
start decreasing after the first one. So sub-container #1's
settings are 290 for horizontal and 165 for the vertical
distances. Sub-container #2 has a horizontal distance of 300 and
a vertical distance of 150. Sub-container #3 is 310 and 135,
subcontainer #4 is 320 and 120.
23. Likewise, the vertical size
will increase. Sub-container #1 has a vertical size of 225, so
sub-container #2 will be 250, #3 will be 275 and #4 will be 300.
24. Have you
saved
this ssc file yet? It might be wise to do this periodically in
order to keep from having to redo everything.
25. Now it gets a little bit
easier. Click on the very first segment of containers that you
had just put in, as shown in the image above. It is the one
where the horizontal is 250 and the vertical is 120. Copy this
segment and then go to the very last background at the bottom and
paste it there. Move it all the way over to the left so that it
becomes our third segment of containers.
26. Go into each subcontainer and
change the horizontal settings to be a minus! -250, -260,
etc. Do not change the vertical settings. The backgrounds
here need to scroll up and left, so you will need to change them all.
27. Copy the second segment of
containers as shown above in the last image and click on the very last
background at the bottom and paste it. Move it over to the left
as far as it will go.
28. You now have four segments of
containers, the image just above shows you two of them. Change
the horizontal distances of these sub-containers also to a
minus! And change the backgrounds to scroll up and right.
29. You're done! Hard to
believe isn't it? I hope this was easy to follow and that I
didn't leave anything out, but I don't think that I did. Now I
will give you some pointers on how to make your own bar
graphics. Save your ssc, change your loading message as desired,
and export that baby!
Making a Bar for Use in Your
Stationery
Open the image you used for the main
one here and select an area of the graphic that you'd like to use on
your bars. Copy and paste that selection as a new image.
OR, simply choose a contrasting color. Make a new image with a
transparent background size 5 x 200. Add a new layer and fill
this either with your chosen pattern or color. If you don't know
how to use your selected pattern, click on the pattern square, you
have to use the little down arrow to choose it and it looks like #
kind of. Now click on the background that shows up there and a
box will open that will let you browse for the one you want.
Yours most likely will be all the way up at the top. Just select
it and click on ok. Now select your image (select all) and fill
it in. Go to Edit/3D/Inner Bevel and choose a bevel style that
looks good to you. Select ok or apply or whatever it says.
Now if you notice, your graphic has a beveled top and bottom which we
do not want. So to make this next step easier, open up your
image edges so you can see the transparency on all four sides.
Just grab the colored top and pull it up, then do the same on the
sides. Click on the deformation tool, which looks like a square
with lines in it, and pull your top up some and then pull the bottom
down. This should get rid of the beveled edges. Merge all
layers and save this as a jpg or png. I personally find that png
files are a lot larger than the jpg's, so I don't ever use that
format.
Main Index - Tutorial
Index
Tutorial Created by
Ozmee, 03/08/02.
©Ozmee 2001-2002. All rights reserved.
This lesson may be copied, saved to personal computers or used by other groups
at will. It may not be used for profit. All images were created by me
except for the main image. Rights for that image remain with it's creator
(whomever that may be).
|