|
Rapture
To view the
completed stationery please click here. To download the zip files
with all graphics, sound and Scrippy-3 ssc file, click here.
If you are using Scrippy-2 this ssc probably won't work. In
that case, you have two choices. Download
the upgrade or create your own ssc file for this lesson.
Let's get
started! Open up your scrippy and click on File - New or click on
the little white paper to start up a new master scrippy.
1. Insert a
background using the rapture-bg4.jpg graphic. Non-scrolling.
2. Insert a
grooved frame of 6 pixels and use the color #4F0000. For users of
Scrippy-2 the colors are 79-0-0.
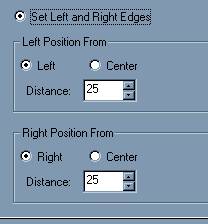
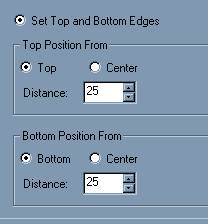
3. Insert a
positioned container and set all edges to 25.
4. Next you need a frame, make it inset, 2 pixels
and use black.
5. Now insert another background and use the
rapturebg2.jpg. This scrolls up and right and no other changes are
needed here.
6. Put in another positioned container and set all
edges to 35. This container sits over at the far left as does the
last one which was inserted.
7. Add another 2 pixel frame using black and make it
inset as well.
8. Now add another background. Use
rapture-bg4.jpg again. Non-scrolling.
9. Insert a positioned image. Make it from the
left and the top. The numbers are going to be left sitting right
at zero. Use rapture-2.gif for this.
10. Insert the other positioned image. This one sits
right and top using the numbers of zero again. Use rapture-3.gif
for this side.
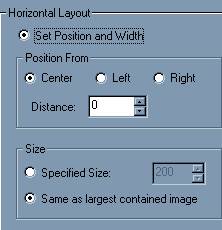
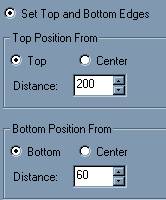
11. For the main image I needed to use another
positioned container. So insert one of these next. The
settings are as shown.
12. Now insert a positioned image and use the
rapture.jpg graphic. Set this to horizontal - centered and
vertical from the top. No other changes are needed.
13. Now we will insert the rapture animation.
Insert a positioned image and choose the graphic called rapture-ani.gif.
This goes 40 pixels from the top for vertical and it is horizontally
centered at 0.
14. The next thing to add is the part that says by
Ozmee. Now naturally you can make your own image to go here, or
you can use any other graphic you would like, as this one is going to be
by you and not me, lol. Or you can skip this positioned image if
you'd like. Put in a positioned image and set it 120 from the top
and centered. Use the graphic called rapture-byoz1.jpg if you just
want to use mine for the time being. If you use a different image
here that is larger than the one I used, you might have to move your
message area down a little lower. To do that you just increase the
number of pixels from the top.
15. Now add some sound. Get the midi called
jewel-hand.mid and set it to repeat indefinitely.
16. Add a message area. Set this at 160 from
the left and the right. 575 from the top and 60 from the bottom.
17. Add a ticker.
18. Add a loading message. On mine the minimum
display time is set to 1.5. Click on the centering options for the
middle and insert the image called rapture-cbyoz or any other graphic of
your choice. Remember, you can put in the pink background after
you have saved your stationery by using a text editor. For
Scrippy-3 there is a new place to put this. In Scrippy-2 you go to
the loading message divider and right before where it says background
you type in bg="" and in between the "" put the
entire path of the background. As well, you must go up at the very
top and enter in <BODY background=""> and in between the
"" again put the entire path of your background graphic.
However, in Scrippy-3 it goes in a different place. Find where it
says body background and go over again before background and insert
it. Here is an image to help.

Congrats! You now have your own Rapture
stationery. If you don't like your two right and left images being
on top of the frames you can always change the numbers of from the top
and the left and right to make it go below them. For this stat you
would need to change it from 0 to 35.
 
Main Index - Tutorial Index
Copyright Ozmee 2001.
Contents of these pages may
be copied, printed, saved, or passed around.
|