|
Click here to view the
finished product. Click here to download the
zip file which includes all graphics, sound and the ssc file.

1. Open up a new master Scrippy and insert a background. Use
psalm-bg.jpg. Yes you are correct if you noticed I misspelled that word.
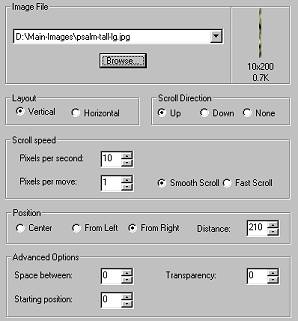
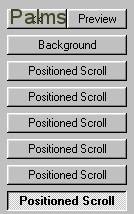
2. Insert a positioned scroll. Use the graphic called
psalm-tall-log.jpg. Layout vertical, scroll direction is up, pixels per
second are 10, pixels per move is 1, smooth scroll, from the right at a distance
of 210, and the bottoms are all zeros.
3. Insert a second positioned scroll. Use the same graphic as before
and the settings are: Vertical, up, 10 pixels per second, 1 pixel per
move, smooth scroll and 210 from the left.
4. Insert a third positioned scroll. Use the graphic called
psalm-wide-lg.jpg. Choose horizontal, scroll direction is left, 10 pixels
per second, 1 pixel per move and smooth scroll. Set the position from the
bottom and leave everything from that point on at zero.
5. Insert a fourth positioned scroll and use the psalm-tall-lg.jpg
again. The settings are Layout Vertical, scroll direction is up, 10 pixels
per second and 1 pixel per move, smooth scroll. Set the position of this
one from the right and leave all the numbers at zero.
6. Insert a fifth positioned scroll and use the psalm-wide-lg.jp.
Set this one horizontal, scroll direction is left, 10 pixels per second and 1
pixel per move with a smooth scroll. Set the position from the top and
leave all of the numbers at zero.
7. Insert the sixth and last positioned scroll using the psalm-tall-lg.jpg
graphic. Set this to Vertical, scroll direction up, 10 pixels per second
and 1 pixel per move and click smooth scroll if it is not already checked.
The position is from the left with all numbers set at zero.
This is what you should now show on your master scrippy.
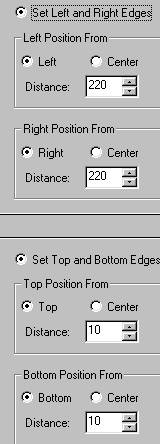
8. Insert a positioned container. Set the left and right edges at
220 each. Set the top and bottom at 10.
9. Now Click on Insert and choose a message area. The margins for
the message area are 5 on the top and 5 on the right. 10 on the left and
10 on the bottom.
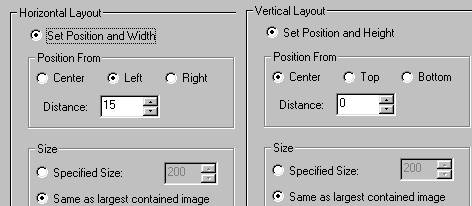
10. Click on the background up top and then go to insert and insert a
positioned container. Make it 15 from the left and Centered at 0.
This image below is cut apart and pasted back sideways here to save room but you
should be aware that the Vertical Layout in the scrippy is underneath the
horizontal layout. I don't want anyone to get confused.
11. Under that positioned container, insert a positioned image. Use
the graphic main-left.jpg. As the default settings should be centered for
both, just check to see that it is centered and all of the numbers should be
zero.
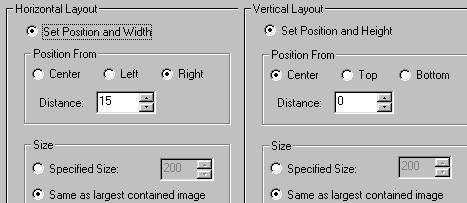
12. Click on background again and insert another positioned
container. The settings for this one are 15 from the right and centered
vertically with those numbers being 0. Make sure that this container and
the last one has 'same as largest contained image' checked.
13. Insert a positioned image under this container and use the
main-right.jpg image. The settings should all be centered with all numbers
at zero.
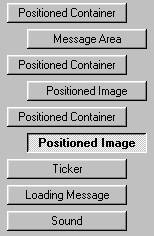
This is what the bottom half of your scrippy should look like now.
14. Insert your ticker, your loading message and your sound and that's
it! The sound provided is myla.mid.
CONGRATULATIONS! YOU'RE DONE!
|

Index
|

Tutorials
|
All content on this page other than the main graphics used
for the stationery are the creation of Ozmee. Reuse is allowed.
Main graphics are the intellectual property of the author.
Tutorial created by Ozmee, October 2001.
|
