|


Click here
to view the completed stationery. Click here
to download the zipped file with all components, including the ssc.
You will need some decompression program such as winzip to open this
file.
1. Open
Scrippy and click on File-New or click on the white icon at the top
left to start up a new master scrippy.
2. Insert a
background and use lily-bg2.jpg.
3. Insert a
sound. It is called godmusthavespent.mid. Set it for continuous.
4. Now insert a
ticker. Put anything in there that you'd like.
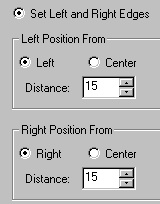
5. Next we need a
positioned container. Set all margins to 15 over on the
right. I'm only showing the horizontal but vertical is done the
same.
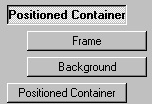
6. Under that
container insert a frame, inset, 2 pixels and use the color #0A444F
7. Next we need
to insert a background. Use lily-bg3.jpg.
8. Insert a
second main container and set all of the margins at 25. Make
sure that this one is lined up with the first, as it is a 'main'
container.
9. Insert a background and a frame under this
second container. The background to use is lily-bg1a.jpg
The frame is the same as before, inset, 2 pixels wide and color of
#0A444F
10. Next, we will insert another main positioned
container. Set all margins to 35.
11. Put in a background and use
lily-bg3.jpg. Now insert another background, use the color white
and make it 50% transparent. You can skip this second background
if you are using one that is easy to read over. I found this one
to prohibit reading easily so I added the second background.
12. Insert another 2 pixel inset frame also
under this container and use the same color as before.
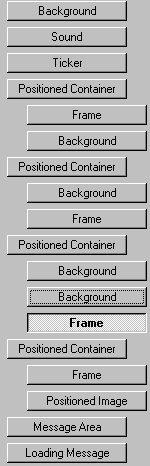
13. Here is a picture of how everything
goes. Please check what you have against this and make sure your
containers are in the right places. Most often the errors I see
concern having put something in the wrong place.
14. Next we will put in another container and
under that a frame and our main image. This container has all of
it's margins set to 40. The frame is a 10 pixel, double style
and placed over the background using the same color as before.
15. Go to insert/positioned object/positioned
image and use the graphic called lily-done.jpg. Set this from
THE TOP at 20 pixels. Failure to set this image 'from the top'
will result in the stat not working properly.
16. Next we will put in a message area.
Note in the image above that it does not go inside of any container
but sits alone over at the left margin. The right and left
margins should be set to 120. The top margin is 445 and the
bottom margin here is 50, although it can be made smaller than that,
probably even 30 would work just fine. Type some text in here,
select it and change it to be centered.
*note: to make sure your text area works, type
in enough text so that one line is filled and becomes two lines.
Now enter to a third line, type a letter and enter again until you
have five or six lines. Preview the stat and make sure your text
is staying where you need it.
17. Insert a loading message. If you do
not want to use one, uncheck use loading message and there won't be
one.
Congrats! You are all done!
Main Index - Tutorial
Index
Tutorial Created by
Ozmee, 12/12/2001. (Revised 1/24/02)
©Ozmee 2001-2002. All rights reserved.
This lesson may be copied, saved to personal computers or used by other groups
at will. It may not be used for profit. All images were created by me
except for the main image. Rights for that image remain with it's creator
(whomever that may be).
|