container and paste it five more times to fit under this one evenly so that
they are all in alignment.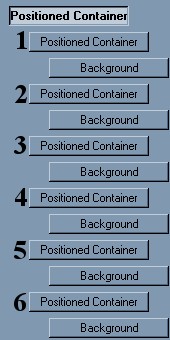
5. The
second container is set as follows: Vertical - left, distance 5 and size
of 1. Top and bottom margins are set at 0. Go into the background
area and make these changes. Set the pixels per second to 20 and change
the horizontal start to 1.
6. Third container: Left -
distance of 10 and size of 1. Top and bottom margins set to 0.
Background changes: Pixels per second is 30 and horizontal start is 2.
7.
Fourth container: Left - distance of 15, size of 1. Top and bottom
margins of 0. Change the background pixels per second to 40 and the
horizontal start to 2.
8. Fifth container: Left -
distance of 20, size of 1. Top and bottom margins of 0. Change the
background pixels per second to 50 and the horizontal start to 1.
9.
Sixth container - Left - distance of 25, size 1, top and bottom margins of 0.
Change the background pixels per second to 60 and the horizontal start to 0.
10.
Go back to the main container for these that were just done, click on it then go
to Edit, copy container. Paste this and move it below the last background
shown. It needs to go over to the left. In the main positioned
container make these changes: Horizontal is center, distance 220 and a size of
30. Vertical is top - 0 and size of 400. This set of containers will
appear on the right side of your stationery.
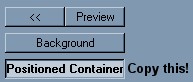
The image on the left is the first container at the top,
that is what you need to copy here. Copying this will also copy all of the
sub-containers. The second image shows you where to put this copied group
once it's pasted.
11.
Again, paste in this group of positioned containers and make sure that it is at
the bottom of everything plus as always, it goes all the way over at the left
margin. Delete the sixth container as it won't be needed. Horizontal
is Center - distance of 0, size of 550. Vertical is top, distance of
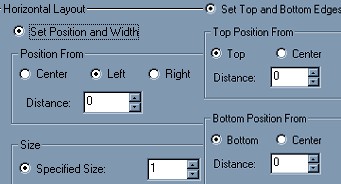
20 with a size of 35. The changes for each sub-container are as follows:
Container
#1: Horizontal = Left & right edges set to 0, Vertical
= center, distance of 5, size of 1.
Container #2: Horizontal = Left & right edges set to 0, Vertical
= center, distance of 0, size of 1.
Container #3: Horizontal = Left & right edges set to 0, Vertical
= center, distance of -5, size of
1.
Container #4: Horizontal = Left & right edges set to 0, Vertical
= center, distance of -10, size of
1.
Container #5: Horizontal = Left & right edges set to 0, Vertical
= center, distance of -15, size of
1.
12. The backgrounds for these containers also need to be
changed. Use the graphic called tirav.jpg for these second two sets of
containers. Be sure to change back to 0 the
horizontal start in each background, remember this was copied from an
earlier section.
Background #1 - down, 10 pixels per second, no other
changes.
Background #2 - down, 10 pixels per second, vertical start 1.
Background #3 - down, 10 pixels per second, vertical start 2.
Background #4 - down, 10 pixels per second, vertical start 1.
Background #5 - down, 10 pixels per second, vertical start 0.
14.
Now copy that last group of containers and paste it, then move it to the bottom,
making sure it is over at the left. For the main positioned container,
horizontal is center, distance of 0 with a size of 550. Vertical is top,
distance of 350 and size of 35. Sub-container changes are as below:
Container
#1 - Horizontal = Set left and right edges to 0, Vertical = center, distance of 5, size of 1.
Container #2 - Horizontal = Set left and right edges to 0, Vertical = center,
distance of 0, size of 1.
Container #3 - Horizontal = Set left and right edges to 0, Vertical = center, distance of -5, size of 1.
Container #4 -Horizontal = Set left and right edges to 0, Vertical = center, distance of -10, size of 1.
Container #5 -Horizontal = Set left and right edges to 0, Vertical = center, distance of -15, size of 1.
No
background changes are necessary as they are the same as the last group.
15.
Insert a loading message and a ticker. Keep your loading message at 1.5 or
below unless you are using an animation which requires longer time.
16.
Insert another positioned container. Horizontal is centered, distance 0
with same as largest contained image checked. Vertical is
set from the top, distance of 200 with same as largest contained image checked.
17. Under
this insert a background and use the image oror.jpg. This is set to up and
right, fast scroll at 500 pixels per second. However, you can use 50 or 80
pixels per second as well with satisfactory results. Layer with other
objects is checked.
18. Now you need to insert a positioned
image which also goes under this last container. Use the image
tree3.gif. Horizontal is centered and vertical is set from the top.
The number is left at 0 as it is being positioned by the container it is in.
19.
This is the place to enter any positioned images such as Sonia has in her
original stationery, hers says Lights, with love, Sonia. If you wish to
put in a positioned image here, try it centered - 0 for horizontal and vertical
put it from the top at 80 pixels.
20. Insert a sound.
The file used is gnomos.mid. Set it to play continuously.
21.
Next and last, is the message area. Left and right margin are set at
120. Set it to be 400 from the top and 25 from the bottom. Set the
scrollbar base color to #AF7701.
22. That is all there is
to it. You can see that the flashing in and out effects of the container
backgrounds is effected simply by using the starting positions. Great idea
Sonia! Please be sure to give Sonia credit for the invention of this
stationery in your ticker area.