|
Frames Challenge
To view the completed stationery please click here.
And to download the graphics for this challenge, please click here.
Note: This is a lengthy page so please be prepared
for some additional loading time. Thanks.
1. Open up Scrippy and start up a new stationery by
clicking on the white paper icon.
2. Insert a left container, a right container, a top
container and a bottom container. Under each of these (that means
click on each one) then add in a background. This background is
the color #103156. If your 2-3-4th containers fall
under the first one, just grab them and move them over to the
left. None of these go under anything. Make sure to check
'Use the Selected Color'.
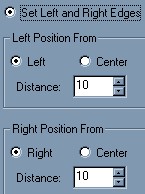
3. Insert a positioned container and set all of the
margins to 10. Do left, right, top and bottom although I am only
showing you the left and right here.
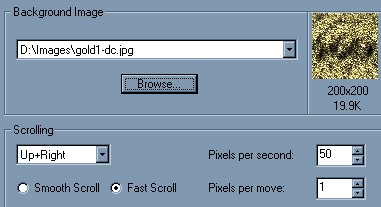
4. Under that container insert a background
and use the file gold-dc1.jpg. This will be scrolled up and
right. I am not going to put an image in for each background but
will tell you which way to scroll each one. Set this to fast
scroll at 50 pixels per second.
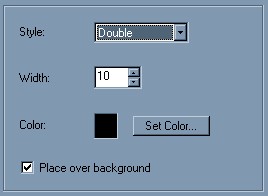
5. Next please insert a frame. This frame does
NOT go under anything. If it falls under your positioned
container, then grab it and move it all the way over to the left.
To do this, click on it and hold down your mouse button, move it over
and let go of your mouse key. This frame is to be black, a double
and the size is 10 pixels. Click on 'Place over background'.
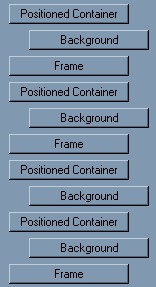
6. Making sure it is positioned over at the left
margin, insert another positioned container with all margins set to
20 pixels. Under that insert a background using the gold-dc1.jpg and set
it to scroll up and right, fast scroll and 50 pixels per second.
7. Add in another frame making sure it goes all the
way over to the left margin. Use the color #103156 and this
also is a double frame, size of 10 with 'place over background' checked.
8. Now here you can use the new part of scrippy that
lets you copy and paste if you want to. Copy the last container
you made which has the gold background in it. Everything will get
copied. Paste this. Now grab it and move it all the way over
to the left at the bottom. Change the container margins to 30
pixels and scroll the gold background up and left.
9. Paste the copied container in again and make sure
to move it to the bottom and all the way over to the left margin.
Change all margins to 40. Use the background called pigboybg1.jpg
and this one does not scroll.
10. Insert another double frame of 10 pixels, color
black and check 'place over background'. This fits over at the
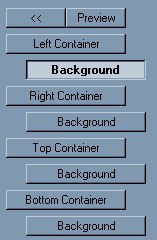
left margin, not under any container. If you look at the graphic
just above #6 you'll see how all these frames are supposed to go, as
well as the containers and backgrounds.
Let's
recap and make sure you have your stat correct up to now. You need
a left, right, top and bottom container, each with their own background
of blue. Next is a positioned container with it's own background
of gold. A frame is next. A positioned container with a
background and another frame is next. Then two positioned
containers with their own backgrounds and another frame. That is
what you ought to have at this time. If you haven't got all of
that, please go back over the first part of this lesson and correct
it. Also, the only thing that goes under a container is the
backgrounds.
11. Now we are going to insert another positioned
container and this one will be different from the others. Set
horizontal to center, distance of 0 and a specified size of 327.
Set vertical from the top, distance of 45 and a specified size of 324.
12. Under that container insert a background using
the gold, set it to scroll fast, 50 pixels per second, down and left.
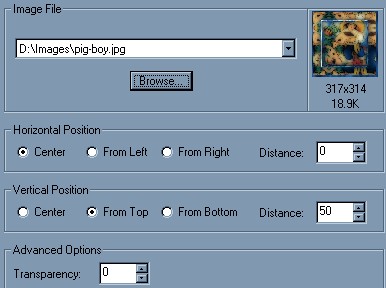
13. Insert a positioned image, this goes over at the
left margin and not UNDER anything! Use the pig-boy.jpg.
Horizontal is centered and vertical is set 'from the top' at a distance
of 50.
14. Now we are going to put in a positioned
container with a frame. Horizontal - distance 0 - size of
304. Vertical is top, distance of 55 and size of 301. Now
insert a frame under that container. The frame color is #70A7E4.
This is the groove style with a size of 6.
15. The next positioned container settings
are: Horizontal - center - 0 and 233 size. Vertical is
'top', 90 and size 231. Insert a frame under that container.
The frame color is #2E7ED8. It is an inset frame size 6.
16. Now we are going to insert four positioned
containers, and each of these is going to have underneath it either a
top, bottom, left or right container. Here's a picture to show you
what it will look like. All of these containers go over to the
left as shown, but the two other items do not.
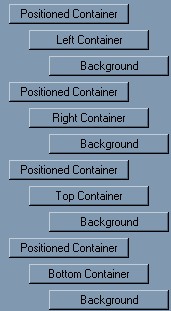
Insert a container, horizontal is center, 0, size
212. Vertical is top, 100 and size of 210. Copy this
container and paste it in three more times.
Under the first container, insert a left container with a
size of 3. Under that insert a background and use the
gold-dc1.jpg. Scroll this down and left, 50 pixels per second,
fast scroll.
Under the second container, insert a right container with
a size of 3. You can copy and paste the gold background in here
next.
Under the third container, insert a top container with a
size of 3. Paste the gold background in here next.
Under the fourth container, insert a bottom container with
a size of 3. Paste the gold background in here next.
Please
refer to the last image and make sure that your scrippy looks like that
shown. If not, go back, re-read the directions and correct any
errors. If this isn't correct, your stat will not be as desired
for this lesson.
17.
Next insert another positioned container. The settings for this
one are from the left and right 110 pixels. From the top is 375
and from the bottom it is 50. This is the box your text is going
to put into.
18.
Under this container please insert a left, right, top and bottom
container. Use the size of 3 for each of them. Under each of
those containers add in a background and use the gold-dc1.jpg.
Scroll them all up and left. A good time to use the copy and paste
feature :-)
19.
Next insert a background. This background is going to be EVEN with
the left, right, top and bottom containers. The color to be used
is #103156 and make sure 'use the selected color' is
checked. Below is an image to show you how these parts should all
be lined up. Pay special attention to where this last
background has been placed.
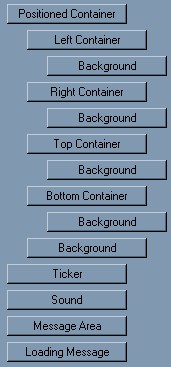
20. Next add a ticker and the sound. The sound
is ants-marching.mid.
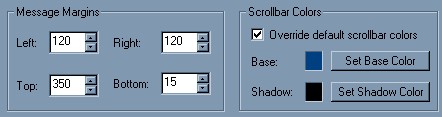
21. Insert a message area. The scrollbar color
base is #004080. The text for this area is centered.
To do that, type in something here and darken it in to select it, then
click on the center icon. 
22. Put in a loading message last. Insert a
graphic of some kind here, or simply put in some text.
Congrats! You have successfully mastered
frames!
Main Index -
Tutorial Index
Copyright Ozmee 2001.
Contents of these pages may
be copied, printed, saved, or passed around.
|