|

Yet
another tutorial for everyone. The finished stationery may be viewed
by clicking here.
Click here to download a zip file
(71kb) with the ssc and graphics used in this tutorial. The sound file was
omitted because of it's large size. As always, please feel free to use
your own graphics, however I advise using those provided while you are
learning. As the tutorial progresses and we come to the point where we
are discussing the images used for the kaleidoscope, I will attempt to
explain how to change your script for your image. Please note, if I do
not include a step then it was not meant to be included, however this should
not keep you from trying different things in Scrippy. There are 18
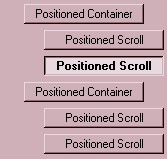
positioned containers and two
positioned scrolls in this tutorial!
1. Insert a background, red-pat1.jpg.
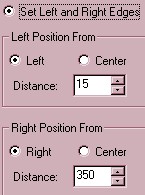
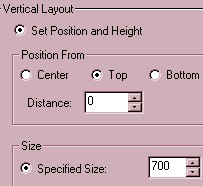
2. Insert a positioned container and use the
settings as shown below. (Set left and right edges, 15 from the left and 350
from the right. Set Vertical from the top with a distance of 0 and
specified size of 700.)
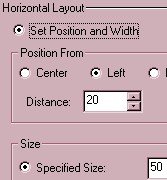
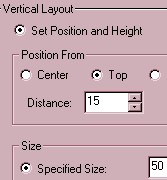
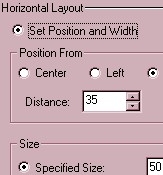
3. Insert a postioned container under the first
one with settings as below: (Horizontal - set position and width, 20 from
the left and size of 50. Set Vertical Layout - 15 from the top and
size of 50.
4. Insert a frame of 4 pixels, inset and color of red
(255-0-0).
5. Insert a background and use red-fleck1.jpg.
6. Insert another positioned container and set
all of the margins to 10. (Set right and left, top and bottom)
7. Insert a frame of 4 pixels, color red and inset.
8. Insert a background and use the ypat3.jpg.
Set this to scroll up+left and leave it at 10 pixels per second, 1 pixel per
move.
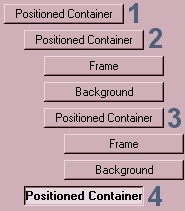
9. Insert another positioned container.
This container should be equal with the second container that you
inserted. Here is a picture to show you. #4 which is the one you
are inserting now, should be even with #2. The settings are as
follows: Horizontal is 20 from the left, size of 50. Vertical is
65 from the top with a size of 300. Thanks to a sharp individual for
pointing this omission out!
10. Insert a frame of 4 pixels, color red and inset.
11. Insert a background and use the red-fleck1.jpg.
12. Insert a positioned container and set the
right, left, top and bottom margins all to 10 pixels.
13. Insert a frame, color red, 4 pixels and inset.
14. Insert a background, use the ypat3.jpg and set
scroll to up+left, 10 pixels per second and 1 pixel per move.
15. Now, click on the very first background you
inserted and click on insert a positioned container. This
container should be all the way to the left as is #1 above. The
settings for this container are: Horizontal; 35 from the left and size
of 50. Vertical; 365 from the top and a size of 50.
16. Insert a frame of 4 pixels, color red and inset.
17. Insert a background using the red-fleck1.jpg.
18. Insert another positioned container and set
right-left, top and bottom edges to 10 pixels.
19. Insert a frame of 4 pixels, color red and inset.
20. Insert a background using the ypat3.jpg and scroll
it up+left, 10 pixels per second and 1 pixel per move.
21. Insert another positioned container and
make sure that this container is also all the way over at the left as
before. If you inserted it and it fell beneath the one above, just
grab it with your mouse and move it over to the left. The settings
are: 35 from the right, size 50, 15 from the top and size 50.
22. Insert a frame, 4 pixels, color red and inset.
23. Insert a background, use the red-fleck1.jpg.
24. Insert another positioned container.
All edges should be set to 10 pixels as was described previously.
25. Insert a frame, size 4 pixels, color red and
inset.
26. Insert a background and use the ypat3.jpg.
Scroll this up+right and change nothing else.
27. Now we will insert another left-edged container.
The settings are 35 pixels from the right and size of 50. 65 from the
top and size of 300 for the vertical layout.
28. Insert a frame of 4 pixels, color red and inset.
29. Insert a background and use the red-fleck1.jpg.
30. Insert a positioned container and set all
edges to 10 pixels.
31. Insert a frame, 4 pixels, color red and inset.
32. Insert a background and use the ypat3.jpg.
Scroll it up+right as before.
33. Insert another positioned container and
make sure this one also is located at the left edge. Horizontal is 35
pixels from the right and size of 50. Vertical layout is 365 from the
top and size of 50.
34. Insert a frame of 4 pixels, color of red and
inset.
35. Insert a background and use the red-fleck1.jpg.
36. Insert a positioned container and set all
edges to 10.
37. Insert a frame of 4 pixels, color of red and
inset.
38. Insert a background using the ypat3.jpg.
Scroll it up+right as before.
39. Insert a positioned container and use these
settings: Horizontal; Center 0, size of 375. Vertical; Top 40,
size of 304. This container also abuts the left side of the scrippy
master.
40. Insert a frame of 6 pixels, color red and inset.
41. Insert the red-fleck1.jpg background next.
42. Insert a positioned container, edges all
set at 15.
43. Insert a frame, color red, size 4 and inset.
44. Insert a background and use the tanbg4.jpg.
Non-scrolling.
45. Next insert a positioned container with
these settings: Horizontal; Center -108, same as largest contained
image. Vertical is Center, 0 and same as largest contained
image. This is the container that will hold your kaleidoscope and it
goes to the far left edge. The number of -108 is acquired by dividing
the image width by two.
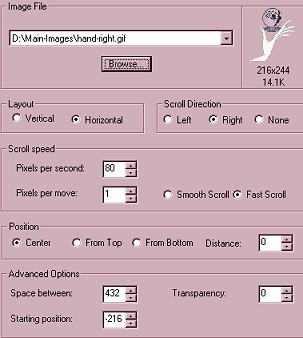
46. Insert two positioned scrolls. In the first
one choose the hand-right.gif, horizontal, right, 80 pixels per second, 1
pixel per move, fast scroll. The bottom boxes will use these
settings: Space Between is 432. This is double the width of your
graphic. Starting position is -216. This is the width of the
graphic.
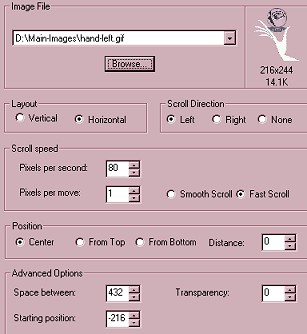
The settings for the second scroll are as shown
above. Horizontal, left, 80 pixels per second, 1 pixel per move,
fast scroll; space between 432 and -216 for the starting position.
47. Insert another positioned container which
should be even with the last one you did, and insert two more positioned
scrolls. The settings are - horizontal Center and 108, Vertical is
Center - 0 and size is set as largest image contained.
Settings for the first positioned scroll is horizontal,
left, 80 pixels per second, 1 pixel per move, fast scroll, space between 432
and starting position 216. The settings for the second positioned
scroll are the same except the scrolling direction is set to the right.
******Now we will discuss how
to use your own images for this or any other stationery. The two
positioned containers are set half of the width of your image from the
middle, one will be a minus and one will be plus which doesn't show, it is
just a regular number. These should both be centered and same as
largest contained image chosen. If your image is 400 pixels wide, the
settings would be -200 for the first container's horizontal width from the
center and 200 for the second positioned container. Please take a look
at your positioned container for these positioned scrolls and see what I
mean so you can understand it. Now, each positioned scroll is set up
like this: right scroll, left scroll. The right image goes with
the right scroll(#1) and the left image with the left scroll (#2).
Each one has a minus number for the starting position which is equal to the
image's width, and the space between is twice the width of your image.
The second two positioned scrolls are opposite, left scroll and then right
scroll. The numbers are positive but the same as for the first two
positioned scrolls. Right image goes to right scroll and
left image to the left scroll. I hope this doesn't confuse anyone but
if so please feel free to ask for more clarification. Basically, when
I go to do one of these I open up the ssc for this type and work on a second
ssc. That way I can go back and forth between the windows and set them
up. Yes, I always forget, lol.
48. Insert a positioned container and make sure
it is at the very left of your master scrippy. This will be for your
message area. Center - Distance of 0, size of 360. Vertical
Layout is 355 pixels from the top and a size of 316. This message area
can be moved to a lower position if your scroll area is higher than the one
used here.
49. Next, insert a message area. Set all margins
to 10.
50. Insert a frame of 6 pixels, color red and
inset.
51. Insert a frame of 10 pixels, color black and
inset.
52. Insert a background and use the tanbg4.jpg.
Non-scrolling.
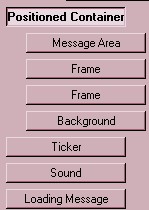
53. Next you can insert a ticker, sound and a loading
message. For instructions on how to insert a background graphic into
your loading message, please refer to the main Scrippy tutorial page.
YOU ARE DONE!
If you have any problems with this tutorial please let me
know so that I can make changes. If you simply have a problem
understanding the directions or you think there should be more picture
examples, let me know that too! I always appreciate your input and
ideas for making these tutorials easier for everyone to use!
|
Main Index

|
Tutorials
Index

|
This
website and all content may be freely copied, reproduced or shared without
prior permission from the webmaster. All tutorial graphics represented
here are originals and all tutorials are provided by the webmaster.
ScrippyMe created by
Ozmee
|