|
1. Start a new scrippy ssc by clicking on the white
paper icon or choose File/New.
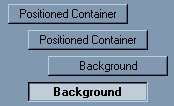
2. Add one background of black and then add another background
and use the gold2-dc.jpg image. This scrolls up and right at 30 pixels,
fast scroll.
3. Save this ssc file by going to file/save as, and put
it wherever you save your ssc files. Give it a name you can remember.
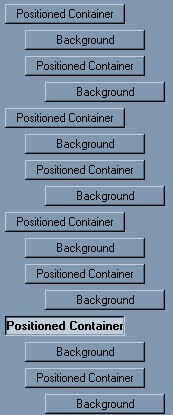
4. We need a positioned container here, set all of the
margins to 18.
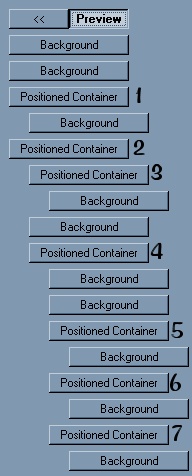
5. Now we will need a background so insert one and use the
gold again, scroll it up and right, 30 pixels, fast scroll.
6. Insert a positioned container, all the way to the
left, and make all margins set at 20.
7. Now under this last one you will insert another
container with these settings: Horizontal - Center, distance 0, size of
423. Vertical - top, distance of 48 and size of 423.
8. Insert a background under that container, using the
gold again, scroll it left and up, 30 pixels, fast scroll.
9. Insert a background and make sure this one is even
with the second positioned container. A picture here will help
you. This background is set to the color of black.
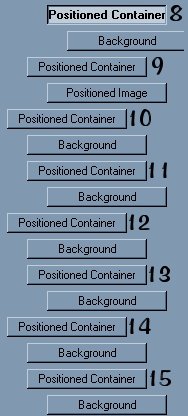
10. We need another container here, it is put even with
the second one shown above. By clicking on the first positioned
container shown it will automatically fall into the right place. Set
this center - 0 - 420 for horizontal and top - 50- 420 for the vertical.
11. Insert a background using the gold graphic.
Scroll it up and left, 30 pixels and fast scroll. Now insert another
background under that, they should both be even with each other, and use the
graphic called black holes. This second background does not scroll.
The next section is for four positioned containers consisting
of the starburst graphics.
12. Now insert a container and make sure it's even with
the last background you did. Set this to left and top of 0, same
size as largest contained image.
13. Now put in a background and use the graphic called
starburstleft. Scroll this up and left at 80 pixels per second and make
it fast scroll. Under advanced options at the bottom, set the horizontal
and vertical spacing to 160.
14. Now go and copy that last container and paste it,
and move it so that it is even with the last one, yet on the bottom.
Change the horizontal setting to right. Go into the background
and change the scroll to up and right. Leave everything else
alone except change the graphic to starburstright.
15. Copy the first container with starburstleft and
paste it down at the bottom so that it is even with the last two
containers. This should be set to left and bottom. In the
background part, change the scroll to down and left and use the graphic starburst
left bottom.
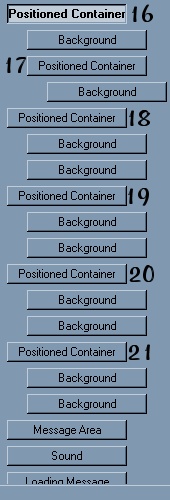
16. Copy the second container and paste it at the
bottom, even it up with the other three containers. The horizontal
should be set to right and bottom. The graphic is starburst
right bottom and it scrolls down and right.
17. We need to insert another positioned container. Set
this as follows: Horizontal is center, 0 and same size as largest
contained. Vertical is top and 50, same size as largest contained.
This should be even with the first container that holds the starburst
containers.
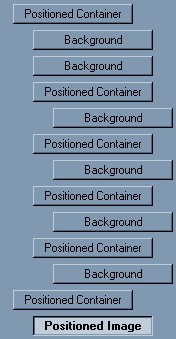
18. Now put in a positioned image and use the dragon.gif.
You should have this set at horizontal center and from the top.
19. Next we will do a series of four positioned
containers, each one having a background, another positioned container and
another background. So, go ahead and insert the first one. We will
copy it and paste the last three. The settings are left - 0 - size 100
for horizontal and top - 0 - size 100 for vertical.
20. Insert a background and use the gold. Scroll
it up and right, 30 pixels per second and fast scroll.
21. Put in another positioned container which falls
under the first one. Horizontal is center - distance 0 and size of
97. Vertical is center - distance 0 and size of 97.
22. Insert the background and use the black holes
gif. Non-scrolling.
23. Ok, now click on the very first container that you
just made in that last group, copy and paste it three more times. Use
the settings below for each one. Nothing is changed except that shown
for the top containers in each group.
Container #2: right - size 100, top - size 100.
Container #3: left - size 100, bottom - size 100.
Container #4: right - size 100, bottom - size 100.
24. Now we have a another series of four positioned
containers. Let's do #1 and then copy and paste it. Set the left
and right edges to 0. Set vertical from the top, distance of 0 and size
of 18. Insert two backgrounds under that container. For the first
one, use the gold graphic. Scroll it up and right at 30 pixels, fast
scroll. For the second background use the black holes gif. This
does not scroll. Ok, now copy this container set and paste it three more
times, making sure each one is below but even with this one.
25. The only difference in the second container is that
the vertical is set to bottom. But in the third container, reverse the
horizontal and vertical settings. That is, set horizontal left -
distance of 0 and size of 18. Set the top and bottom margins to 0.
In the fourth container do the same but set the horizontal to right instead of
left.
26. Now we will insert a message area. Set this
500 from the top, 120 from the bottom, and 120 for the right and left.
Set the scrollbar to black.
27. Insert a sound and use the file technosong.
28. Insert a ticker and a loading message of your
choice.
That's it! You now have your own shooting stars
stationery. Please make sure to give Lin credit for the ssc creation
when you use this ssc file.
Tutorial Index |