|


To view the completed
stationery please click here. To
download a zip file with all of the graphics and the ssc file please click here.
The backgrounds that you see on this page are also used in the stationery.
I have seen these backgrounds recolored using a brownish-red color and it still
looked nice, even better! So my suggestion for you when you do a tutorial,
is even though most aspects should be followed exactly, there is no reason you
can't make your own background graphics or even just recolor the ones
provided. It won't hurt a bit :-) And this is a pretty small
stationery for the nice effect that it provides.
1. Open a new Scrippy and
insert a background. Use the one called dolphin-bg1.jpg. Change
the transparency from 0 to 1. This is to prevent what is commonly
referred to as the 'jitters'.
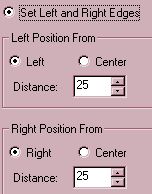
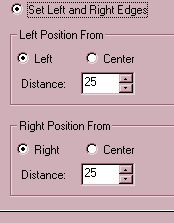
2. Insert a positioned
container. Set the left and right, top and bottom edges both to 25 pixels.
3. Insert an inset frame of 4 pixels and use this color:
196-255-255. It should be a light blue.
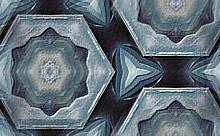
4. Now insert a background. Use
dolphin-bg2.jpg. Both backgrounds are shown reduced at 50% here to save
space. Make the first one scroll up+left at 30 pixels per second, 1
pixel per move and smooth scroll.
5. Insert a second background and use
dolphin-bg3.jpg. Make this one scroll up+right at 30 pixels per second,
1 pixel per move and smooth scroll as well.
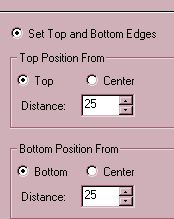
6. Next, we will insert another positioned
container. For this one I'd like you to set all of the margins to
25. As shown below.
This is what your master scrippy should look like at this point.
7. Insert an inset frame of 4 pixels, same color of blue
as before.
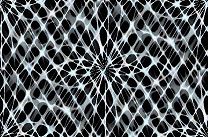
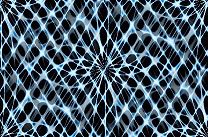
8. Insert a background and use the dolphin-bg6.jpg with
no scrolling. That background looks exactly like the one under this
typing.
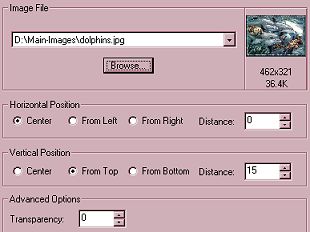
9. Next we will insert our main image. So now
please insert a positioned image and use the settings as shown below. You can
see the it is centered horizontally and is set at 15 pixels from the top.
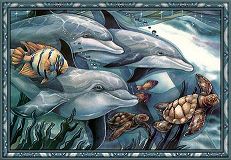
This is the main image at 50%. Sorry, I do not know who the author of
this nice image is.
10. Next we will add the positioned container for the
message area. This container belongs all the way over at the left and
NOT under the previous containers. Settings are; 110 for the left and
right margins, set top and bottom margins 400 from the top and 80 from the
bottom.
11. Add another frame, inset, 4 pixels wide in the same
color as before.
12. Next insert a message area making sure that this
does not go under the previous container, but all the way over at the
left. Set margins to 120 for the left and right, 405 for the top and 70
for the bottom.
13. Insert a frame, size 10, double, place over the
background and use the color #4A5A5E.
14. All that is left is the ticker, the sound and the
loading message. To learn how to include a graphic in your loading
message, or to colorize the scrollbars, please see the Scrippy Tutorials main
page. The midi file used was luvstory.mid.
I hope you enjoyed this Scrippy tutorial!
Created by Ozmee,
August 2001. This tutorial may be freely copied. Graphics shown
other than the main image and the dolphins were also created by me and may be
snagged or reused at will. I place no restrictions of any kind on any
image I create unless otherwise stated.
|