|

To preview the finished result, please click here. To
download the zipped file with the graphics and sound please click here.
Members may download the ssc file from the file directory at Yahoo Groups, but
it is recommended you do this only if all else fails. This lesson consists
of 43 containers so copy and paste will really come in handy for this one!
As soon as you get started, remember to save your scrippy ssc, and save it as
often as possible in order to prevent having to do it all over. Please
save this lesson as checkerboard-yourname.ssc
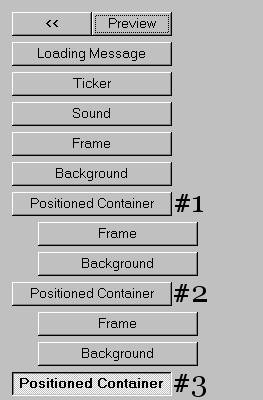
1. Insert a loading message and uncheck it to turn it off
during the creation.
2. Add in a 6 pixel grooved frame and use the color #3282C9.
Be sure to save this color in your favorites as you will need it again.
3. Next put in a background and use the graphic blue-checkerboard.jpg.
4. Our first positioned container is set 20 pixels from
all edges. Set left, right, top and bottom edges, all to 20. In the
image below, this is #1.
5. Select the container again and insert a frame as
before, 6 pixels, groove and using the same color of #3282C9.
6. Another background comes next. Make sure the
container is selected and then add the background. The graphic is
checkerboard6.jpg.
7. Click on the background you just inserted and then
choose to insert another positioned container. Now, move it over to the
left so that it becomes a main container. Failure to do this will
immediately result in the stat not working properly. Set all margins
(left, right, top and bottom) to 40. In the image below, this is #2.
8. Again, choose the main container (the second one) and
insert a 6 pixel blue frame. Then insert a background under that
container. Use the color #C7DDF1 for your background by checking 'use the
selected color. Be sure to save this color in your favorites.
9. This next positioned container is our 'empty' container
which will hold a segment of sub-containers. We do it this way in order to
facilitate easier copying of a large amount of containers. Insert the
container as a new main container using your favorite method. An easy way
to do it is to click on the last thing you inserted, choose to insert it there
and then move it over to the left. Set all of the margins for this
container to 0! In the image below, this is #3.
10. Now with #3 container shown here selected, insert a
positioned container. For horizontal, set this 46 pixels from the right
and give it a size of 50. For vertical, set this to 46 pixels from the top
with a size of 50.
11. Insert a frame, inset, 5 pixels using the color #3282C9
under the new container. Save this color in favorites.
12. Next put in another frame, 5 pixels, ridged using the
color #3282C9.
13. Now put in a background. The graphic is called
checkerboard-blue-4.jpg. This is the first section. Copy this series
of containers, not the main one with the zero margins, just the sub-container
which has the two frames and the background. Click on the main container,
#3 as shown above, and paste this into it. For this stat, it doesn't
matter if the container is pasted above the one you copied! Set this one
to horizontal left and vertical bottom, leave everything else
alone.
14. Select #3 again and paste another series. Set
this one horizontal right and vertical bottom.
15. Click on #3 again and paste one more time. Set
this one horizontal left and vertical top.
Please verify that you have what is shown below before going any
further. It is important to make sure your scrippy master matches this one
exactly, except that it doesn't matter what order those containers were put in
(for a change)

For recap, here is what you should have:
Sub#1 = Horizontal Right - Vertical Top
Sub#2 = Horizontal Left - Vertical Bottom
Sub#3 = Horizontal Right - Vertical Bottom
Sub#4 = Horizontal Left - Vertical Top
If yours match, then you can continue!
16. Click on main container #3 and copy it! As you
know, everything that is inside of this container is going to be copied as
well! Now go all the way down to the bottom and click on the very last
item inserted, which should be a background. Click on the paste
icon. Yes, it is in the wrong place. But grab the #3 copied
container and move it to the left. It should easily move over there.
If yours doesn't, then take the #3 main copied container and move it all the way
to the bottom and then to the left below every single thing on your master
scrippy, then release it. I have found, as was suggested to me by some
members, that by just clicking on the last item and inserting it there, it is a
simple matter to move it over to the left, where it becomes another main
container. Ok, is yours there? If it is, we are now going to change the
main container's margin settings. Change all of the 0 margins to 50.
17. Now repeat the pasting procedure and also move this
series of containers over to the left to become a main container with sub
containers. Change the margins of this main container to be 100 each.
18. Repeat this act two more times. For the next
set, change the margins of the main container to 150 and then for the next one
after that, change the margins to 200. Nothing else needs to be
changed. All we are doing is changing the one container settings to move
the containers over by 50 pixels each time.
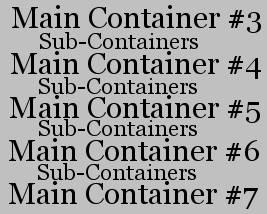
0-50-100-150-200
Each main container has four sub-containers. Each
subcontainer has two frames and one background. Are you with me so far?
19. Now then we will make a new positioned container, it
is a 'main' container which means it goes to the left margin at the very bottom
of your master scrippy. If it is indented under anything, it's not a main
container. Set the left and right margins to 300. Set the top and
bottom margins to 50.
20. Insert a double frame of 10 pixels, placed over the
background and use the color of #1D4A74. If you don't click on place over
background, you'll see a big difference, so don't forget to do that. Copy
that frame and put in two more of those. These frames all should fall
below and within the container you just inserted, which we will call #8.
Now you need to insert a background and we will again use a color, it is #3282C9.
21. Select the background shown under container #8 and
insert another positioned container. As this is a sub-container, it should
fall right into place where you see it here on this image! Set all of it's
margins to 30.
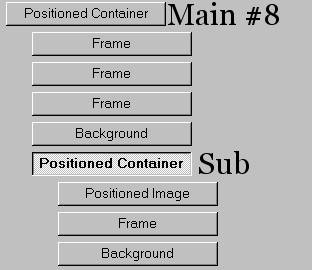
22. We are going to put in the main image now by inserting
a positioned container that goes under the subcontainer. It is called
checkerboard-main2.jpg and it is centered horizontally and set vertically from
the top at 10 pixels.
23. Now we need a 2 pixel outset frame using the color #1D4A74.
24. Insert a background next, it is a color only, #C7DDF1.
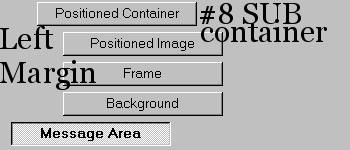
25. I bet you think (or hope) this is almost done
right? Well, we have a bit more to do, lol. Please insert a message
area here next. Make sure that it goes to the left and does not fall
underneath of the subcontainer or the #8 main container. If you put it
there it will not work properly. The margins are 330 for left and
right. Set it 415 from the top and 85 from the bottom.
26. Please insert a new main container which goes at the
left margin under where you see the message area in the above image. Set
all margins to 0!!! Yes, this is another series of containers. And
this is Main Container #9.
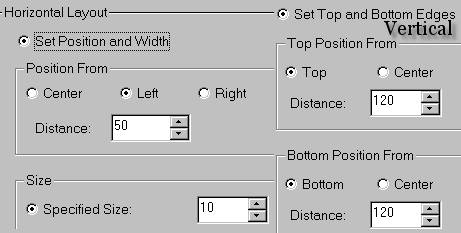
27. Under that one insert a new subcontainer. This
needs to be set horizontally from the left at a distance of 50 and set the size
to 10. Now set the top and bottom edges to 120.
28. Put in a background, checkerboard-blue-4.jpg.
Scroll this up+left, fast scroll at 30 pixels.
29. Copy the sub-container and it's background and paste
it into the main container #9. In order to keep things straight, move it
under the first one. The numbers need to be changed. Set the
horizontal number to 80. Increase the top and bottom margins to 150.
The size stays at 10 and the scroll movement stays the same.
30. Paste it again and move it to the bottom. Change
the numbers here again by 30 each. It will be horizontal 110, top and
bottom 180. Repeat as below.
Paste again, change to 140 horizontal, 210 top and bottom. Move
to bottom.
Paste again, change to 170 horizontal, 240 top and bottom. Move to bottom.
Paste again, change to 200 horizontal, 270 top and bottom. Move to bottom.
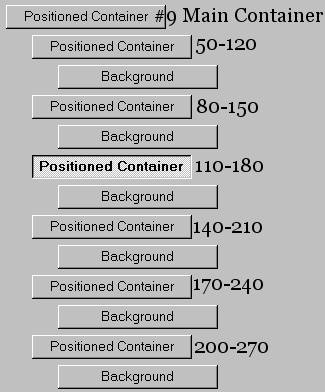
You were asked to move these sub-containers down to help keep them
straight. I do not know if not having them in this order will hurt.
I believe that they can be in any order.
31. We are getting close! Select main container #9
and copy it. Now move down to the very last background shown in the above
image and paste it. Move it over to the left so it doesn't fall under the
previous containers. It is Main Container #10.
32. Do not change the settings of the main
container. But, you must go into each one of the subcontainers and change
them all to right. Change the scroll direction of the backgrounds
to up+right.
33. Add in a ticker. Now add in some sound. I
used a midi called enigma.mid which is also included in the zip file that you
downloaded. As usual, you do not have to use any of these graphics but may
use your own. However, keep in mind if you change the main graphic to a
smaller graphic, your message area will need to have a smaller top margin.
Adjust accordingly.
34. Don't forget to go back and turn your loading message
back on if you want to use it!
I hope you survived this one and that it turned out well for
you! I also hope that I didn't leave anything out, lol...Won't it be nice
when we can name these in our Scrippy's so we don't get lost during the course
of a long stat like this one?
Main Index - Tutorial
Index
As always, content and graphics contained
within this site are absolutely free for the taking with no strings attached.
Website created by Ozmee, May 2001.
|
