|


21. Insert a background of blue and two more frames as
before.
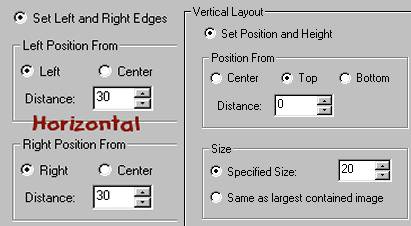
Note: From this point on I will only give the
settings for the positioned containers (shown as PC), to save time and
space. To help insure you understand these settings, here is an image to
help. I will show H&V, always the horizontal will come first and the
vertical second. If you see 30 from the left and right OR top and bottom,
set your container as shown on the left. If it says 0 from the top, size
of 20, do it as shown on the right.
22. PC: H=left and right edges at 60. V=30 from the
top, size of 20.
23. Insert the blue background and two frames as before.
24. PC: H=30 from the right, size 20. V=30 from the
top, size 20.
25. Again, place a background of blue and two frames as
before.
26. PC: H=right at 0, size of 20. V=top and
bottom at 30.
27. Insert a background and two frames as before.
28. PC: H=60 from the right and left. V=30
from the top, size 20.
29. Add the blue background and two more frames.
30. PC: H=right 30, size 20. V=top 30 and size
of 20.
31. Two more frames and the blue background.
32. PC: H=right 0 size of 20. V=set top and
bottom edges at 30.
33. Blue background and two more frames.
34. PC: H=Left 30, size 20. V=set top and bottom at
60 pixels.
35. Blue background and two more frames.
36. PC: H=Left 60 size of 20. V=top 60 and
size of 20.
37. Background and frames.
38. PC: H=90 from the left and right. V=60 from the
top, size 20.
39. Background and frames.
40. PC: H=right 60, size of 20. V=top 60, size
of 20.
41. Background and two frames.
42. PC: H=right 30, size of 20. V=Set top and
bottom at 60 pixels.
43. Background and two frames.
44. PC: H=left 60 size of 20. V=set top and
bottom to 90.
45. Background and two frames.
46. PC: HV=set all edges to 90.
47. Background and two frames.
48. PC: H=right 60 size of 20. V=top and
bottom of 90.
49. Background and two frames.
50. PC: H=60 from the left. V=60 from the bottom,
size of 20 each.
51. Background and two frames.
52. PC: H=90 from the left and right. V=60 from the
bottom, size of 20.
53. Background and two frames.
54. PC: H=60 from the right and V=60 from the
bottom, size 20.
55. Background and two frames.
56. PC: H=30 from the left. V=30 from the
bottom, size of 20 each.
57. Background and two frames.
58. PC: H=60 from the left and right. V=30 from the bottom, size of 20.
59. Background and two frames.
60. PC: H=30 from the right. V=30 from the
bottom, size of 20 for each.
61. Background and two frames.
62. PC: H=Left 0 size of 20. V=bottom 0 size
of 20.
63. Background and two frames.
64. PC: H=30 from the left and right. V=0 from
the bottom, size of 20.
65. Background and two frames.
66. PC: H=Right 0 size 20. V=bottom 0 size 20.
67. Background and two frames.
68. Insert a positioned image and use the keys2.jpg.
This image goes flush to the left margin and not under any of the
containers. Center this horizontally and set it to be 110 pixels from the
top.
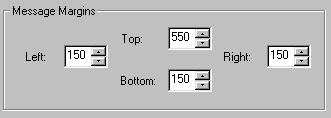
69. Now insert your message area as shown. This also
goes flush against the left margin. 550 from the top and 150 from the
bottom. 150 from the left and from the right.
70. All that is left to insert is your sound, loading
message and ticker.
71. To check yourself, you should have 27 positioned
containers, each one with a background and two frames.
That's it! You're done!
|

Page One
|

Index
|
As always, content and graphics contained
within this site are absolutely free for the taking with no strings attached.
Website created by Ozmee, May 2001.
|