|


This stationery design was created by Karon who has graciously
permitted me the use of her ssc file for this lesson. The stationery
itself was created by me. To download the necessary files, please click here. To view the stationery you are making, click
here.
Note: This is a lengthy stat with many repetitions
of positioned containers, backgrounds and frames. If you wish, when you
get to #3, go ahead and insert these positioned containers all at once (27 of
them), then go back and adjust the settings for each of them. Be sure to
set the blue color as a custom color so that you can just click on it each time.
1. Open up Scrippy and click on File-New or click on the
white paper icon to start up a new scrippy file.
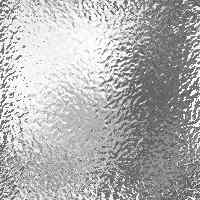
2. Insert a background called silver.jpg which was
included in the zip file you downloaded, or right click on the image below and
save this as silver.jpg to the directory where you will be putting your ssc
file. Set this to scroll up and right at 50 pixels per second and 1 pixel
per move.

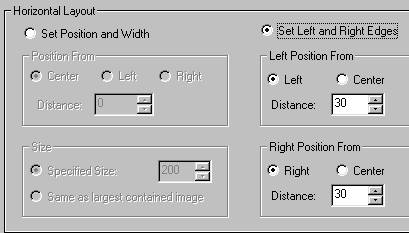
3. Insert a positioned container and set all edges to be
30 pixels from each, right, left, top and bottom, as shown below.
4. Insert a background and use the silver.jpg once
again. This time, set it to scroll down and right at 50 pixels per second
and 1 pixel per move.
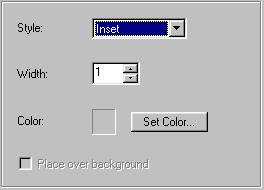
5. Insert two frames, using the default color. Set
each one at 1 pixel wide and make the first inset, the second outset.
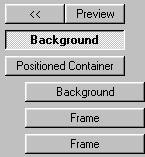
6. This is what you should now have.
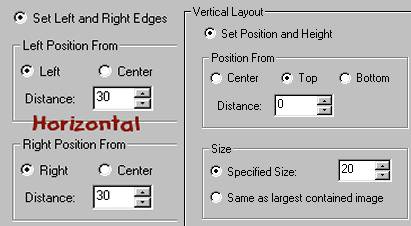
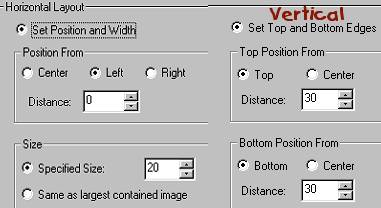
7. Insert a positioned container and set all edges to be
60 pixels. This container should be flush with the left margin. If
it is not there, click on it with your mouse and drag it over. You can
click on the background at the top before you go to insert a container and they
will show up on the left, but it is just as easy to drag one over.
8. Insert a background using silver.jpg and scroll this
one up and right at 50 pixels per second and 1 pixel per move.
9. Insert two more frames. As before, use the
default color, set each at 1 pixel wide and make the first one inset and the
second one outset.
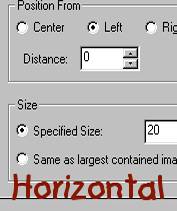
10. Insert a positioned container. Position it
horizontally from the left, size 20 and vertically from the top at 0 with a size
of 20.
11. Next, insert a background and use a color of
blue. The numbers for the blue color as shown are: 11-46-173.
Save this color as you will use it later. Click on Add to Custom Colors to
save it.
12. Insert two more frames, default color, inset at 1
pixel and then outset at 1 pixel.
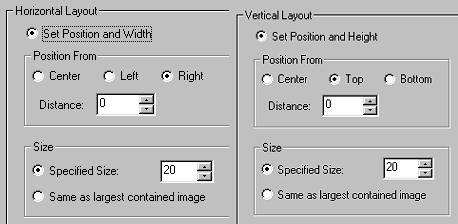
13. Insert another container, flush with the left
edge. Set the horizontal as shown; set the left and right edges at 30
pixels. But for the vertical layout set it from the top at 0 and give it
the size of 20 pixels.
14. Insert a background using the blue color as before.
15. Insert two frames using the same settings as before, 1
pixel, inset and then outset on the second one.
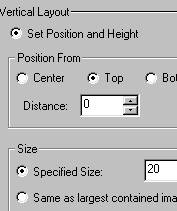
16. Another positioned container is next. Set
horizontal to be 0 from the right, with a size of 20. Set the vertical from
the top at 0 and with a size of 20 also.
17. Add another background and two frames as before using
the exact same settings, blue color, pixels of 1, inset and outset.
18. Insert another positioned container, set horizontal at
left and size of 20. Set the vertical edges to 30.
19. Insert a background using the blue color as before and
two more frames. You will find that this often becomes monotonous. I
will provide you with the amount of containers so that you can count them and
make sure you got every one of them!
20. Insert another positioned container. Set
horizontal from the left at 30 and give it a size of 20. For vertical, set
it 30 from the top and it also has a size of 20.
|

Index
|

Page Two
|
As always, content and graphics contained
within this site are absolutely free for the taking with no strings attached.
Website created by Ozmee, May 2001.
|
