|

To view this stationery please click here.
To download a zip file with all elements of this lesson, click here. Let's
look at some of the new features of Scrippy-3 before we start. If you look
at the File section you will see export Email and under that export
stationery. Using export email means a default 'scrippy' stationery will
be made in the c hard drive where it should go. But if you choose export
stationery, you are offered the opportunity to name your stationery. Using
export email doesn't give you that option. Under Edit there is now an undo
feature as well as the chance to cut or copy your items. Under the insert
feature, wherever your cursor is sitting is where that new positioned container
will end up at. This isn't always where we'd like it, so just drag it to
anywhere you do want to put it. You can copy and
paste entire sections of containers, frames or anything else. I'm not
quite used to doing this however so I may ask you to do it manually, but if you
are comfortable doing it that way please feel free to do so. One of the
best features is in the message area. Insert this and you'll find that is
where you set the color for your scrollbars. As this is the first
stationery I've made with the new program this is all I can report at this time. Let's
get started. Open up your scrippy program, click on File/New or
the white icon to start up a new scrippy stationery. 1.
Insert a background and use the color #400000. For Scrippy-2 the colors
are 64-0-0. 2. Put in a double frame of 10 pixels, click
place over the background and use the color #FFB3B3. 255-179-179. 3.
Put in your first container and set all margins to 7, over at the right. 4.
Insert a background and use gold1-dc.jpg. Scroll this up+left, 330 pixels
and set it to fast scroll. 5. Put in another frame of 10
pixels, double, placed over the background and use the same color as before,
#FFB3B3. (255-179-179) 6. Insert another container and set
all of the margins at 14. 7. Insert another frame of 10
pixels, double, placed over the background, using the same color as before OR
click on the frame in the last container, click edit and then copy frame.
Now click on the new container, click edit and paste frame. 8.
Click on the very first background you installed, click edit/copy background and
come back down and click on the container. Click edit/paste
background. For scrippy2 users, just insert another background as before
using the dark red color. 9. Add in another positioned
container and set all of these margins to 22. 10. Under
that put in a frame, same as before. You can click and copy/paste if you'd
like. Otherwise, use a 10 pixel frame, double, placed over the background
and use the light peach color as before. 11. Insert another
container, and make this one 27 pixels from all edges. 12.
Now put in another background. This is going to be the gold1-dc so you can
copy the first background and paste it in here. This one is exactly the
same as the first background we put in using the gold1-dc.jpg graphic. 13.
Put in another container and set these edges all to 29. 14.
Insert a background using the graphic red-erte-bg1.jpg. 15.
Copy and paste the peach frame as before and paste it here. That is a 10
pixel frame, double, placed over the background, in a peach color. 16.
Insert a positioned container and set all margins to 45. 17.
Insert a positioned image and choose erte-red2.gif. Choose right and top
for placement but you don't need to change the numbers here. 18.
Now we are going to insert a message area. Go ahead and insert it and take
a look at the graphic below. This is a full size graphic of what the new
message area looks like. 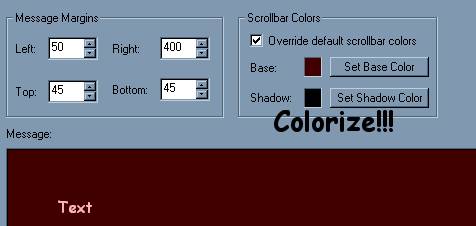
All I can say here is COLORIZE!!!
Click on the override default scrollbar colors and click on set base
color. You need the html color code to put in here but you can do it the
old way too. Use #400000 for the scrollbar base color. The shadow
color gets set automatically but you can feel free to play around with that and
change it at will :-) The text color that I chose is #FFB3B3.
19.
Add a ticker and some sound. The sound is called Gold-Dream and is used
here too! The last thing to add is your loading message. To learn
how to add a background graphic to your loading message area for Scrippy-3 click
here.
CONGRATULATIONS! YOU'RE DONE!
Index - Tutorials
I hope that you have enjoyed doing this tutorial and
that all parts were easy to understand.
As always, tutorials made by Ozmee are free to
save, pass around and share with others. Tutorial created 12/10/2001 by
Ozmee.
Happy Birthday Vanny!
|