|
Containers
To download a zip file with all of the
images please click here.
To see the finished result of this tutorial, please
click here. 1.
Please insert a loading message and check 'use loading message' in order to turn
it off during this tutorial. Remember to return to the loading message and
alter this if you wish to have a loading message in your stationery. 2.
Insert a background and use l2b.jpg. This doesn't scroll but go down to
transparency and set it to 1. Setting the main background to 1 helps with
the jumpiness you sometimes see in stationery. 3.
Next put in a positioned container and set all margins to 120. 4.
Insert a double frame, 7 pixels, placed over the background and use #014F7C for
the color, save this color so you can use it later. This frame goes under
and to the right of the main container, which means it falls within the initial
container. 5. Insert a
background and use the graphic l2a.jpg. Scroll this up and left, fast
scroll at 30 pixels per second. Copy this background and paste it again so
that there are two backgrounds falling under our container. Set this
second background at up+right, fast scroll, 30 pixels per second and set it to
50% transparency. 6. Next we
will insert a second 'main' container. This does not go under the
first one. It sets alone and all the way over at the left. Set left
and right margins to 135. Also set the top and bottom margins to 135. 7.
Under this second container insert a frame, outset style, 2 pixels and use the
color #016AAC. 8. Next insert
a background using the graphic l2b. This does not scroll. 9.
Insert a positioned image using the graphic named lesson2-main.jpg.
Horizontal is set center with a distance of 0. Vertical is set to the top
with a distance of 20 pixels. 10.
Now we will insert another frame. Please make sure that these items show
up in your scrippy master in the order in which they are being done. This
frame is a double, 10 pixels and it is placed over the background. Please
use the color of #014F7C. 11.
Now insert a message area. This item does not go under either of the
containers. It should be placed over to the left margin. If it gets
inserted under the container, move it over to the left. Set all margins to
140 except for the top which should be set to 500. 12.
Insert a ticker and then a sound. Use ZZunknow.mid which is included in
the zip file, or use any midi file which you prefer. 13.
Next insert a frame, 10 pixels, double, placed over the background and use the
color #012C45. This is flush with the left margin. When it is done,
copy it and paste it so that it falls under the first one. 14.
The next section is a series of containers. You may do the first one and
then copy and paste it, changing only the placement settings and the scroll
directions. There are four as these are the containers which hold the side
corner squares. 15. Insert a
positioned container and set this horizontally from the left with a distance of
20 and with a specified size of 100. Use the same settings at the bottom
portion (vertical layout) but set it from the top. Click
on that container and insert a frame of 7 pixels, double, placed over the
background and use the color of #014F7C. Click
on the container and insert a background, using the graphic l2c.jpg. This
scrolls up and left, as this is our left upper corner square. This scrolls
fast at 30 pixels per second. Click
on the container again and insert another positioned container. Set all of
the margins here to 10. Click on
the second container and insert a background, use l2c.jpg. This does not
scroll. Click on the second
container again and insert another double frame of 7 pixels using the color #014F7C
and placed over the background. 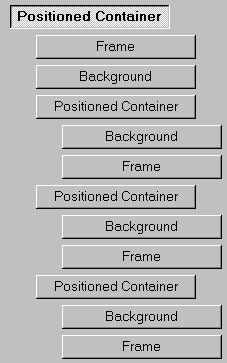
Now,
if you look at this image which shows how this series is supposed to end up
looking, click on the container shown here as the first subcontainer, that is
the second positioned container shown which you just got through making and copy
it! Click on the first positioned container and paste it in. It will
be put in there just under the first one so move it down underneath and even
with the one you just did. In this image it is the third positioned
container shown. Set all the margins of this container to
20. The background should be okay, it is supposed to be up+left, 30 pixels
per second, fast scroll. The frame is okay as well. Go back
to the very first container shown here, that is the first one in this series,
not the first one you did for this stat, and click on that and click paste
again. Now move that container down to the bottom and even with the other
subcontainers. It is the last one shown here, notice how it is evenly
aligned with the other two subcontainers? Set this container's
margins to 30 all around. Change the background to l2a.jpg and set it to
non-scrolling. The frame is okay. Please check your master
scrippy against the image here and make sure that this set of containers is
exactly as shown here. If you put any one of these containers in the right
alignment, it won't work correctly. The way the backgrounds go is first
one scrolls, second doesnt, third does, fourth doesn't. Now
please click on the first container in this series, and copy it.
Now paste this container. More than likely it will go underneath the first
one. You will have to grab it and move it to the very bottom below the
last item and over to the left. Now let the mouse go and it should show up
on the left. Go into the very first container here and change the
settings, horizontal to right and vertical stays at top. This is your top
right container. Go into each subcontainer and change the scrolling
backgrounds to up+right. Paste the container again
and move it down to the bottom as well and to the left. Change the first
container to be set from the left horizontally and the bottom in vertical.
Change the backgrounds that scroll to down+left. Now paste it one
more time and move it down and to the left. Change this main container to
horizontal right and vertical bottom. Change the scrolling backgrounds
here to down+right. 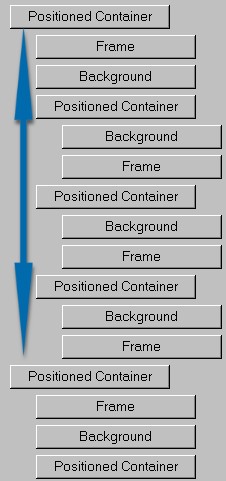
Look
at this image and make sure your container sections are identical. This
shows you how the second, third and fourth are all lined up evenly with the
first one. This concludes the lesson on containers. Main
Index - Tutorial Index
Terms for reuse of any information at this
website may be found on the index page.
Website created by Ozmee, May 2001.
©Ozmee 1999-2002
All rights reserved.
|