
Welcome to the Dream tutorial. Download the zipped
file here and preview by clicking here.
This lesson has been totally redone as of 03/01/02. If you use different
graphics and have problems with the scrolling lines, here are some things that
you can try. Look for the sub-container holding the pink-shiny
backgrounds for each side, they start at 0 and go to 54. Either delete
the first one that is set 0 from the left as well as the one that is set from
the right, or change it to 60 which will move it to the inside. Change
the top and bottom margins to 4. When using different graphics for this
lesson, it was discovered that the lines weren't short enough. Changing
the 2 to a 4 will shorten them. If this is not enough, then add another
one or two pixels to it.

1. Open up a new Scrippy master (a blank scrippy) and
insert a loading message, then uncheck 'use loading message'. This turns
off the loading message while we are working on this lesson. Remember to
come back at the completion of the lesson to turn it back on if you desire a
loading message.
2. Insert a background and use the graphic called
dreambg-pink-shiny.jpg.
3. Insert a positioned container and set all margins to
10. This places the edge of this container 10 pixels away from all edges
of the viewing area. Main #1
4. Into this container we will insert a background
called dreambg-purple1.jpg.
5. Click on that background and insert another
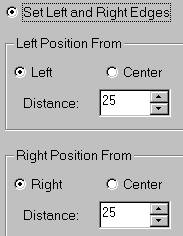
positioned container. Now move this container over to the left so that
it becomes main container #2. Set the margins for this container all to
25. That means you will use the settings over at the right which say,
set right and left edges and set top and bottom edges.
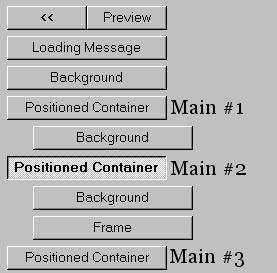
6. Now insert a background under main #2 called
dreambg-pink1.jpg.
7. Insert a frame, 4 pixel inset using the color #D9BBC4.
8. Next we will insert another main container, #3.
Set all edges to 40. Make sure that it meets the left edge, as the other
main containers in the image above are doing.
9. Repeat here the 4 pixel inset frame of pink.
Add in a background also and use the image called dreambg-purple1.jpg.
10. Making sure that the background you just added in is
still selected, go to insert and put in another positioned container.
Set all edges to 0. This sub-container will hold a bunch of
sub-sub-containers which are going to be the scrolling lines on either side of
our stationery.
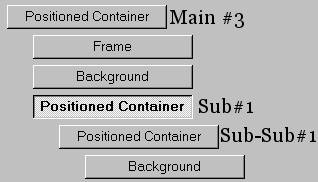
I called these sub-sub's so you can see that they are going underneath a
sub-container. Notice the positioning of these containers. The
fact that each one of these are indented from the previous one simply means it
is being held inside of that first one.
11. Making sure that the sub-container is selected,
insert another positioned container. This is sub-sub#1. For
the horizontal settings, set this from the left at 0 distance and give it a
size of 3. Set the top and bottom edges to 2. For each one of
these, the top and bottom edges are all 2.
12. Into that container insert a background. It is
the dreambg-pink-shiny.jpg graphic and it needs to scroll up, fast at 30
pixels per second and 1 pixel per move.
13. Click on sub-sub#1 and copy it. Now click on
the background under sub-sub#1 and paste your copy there. Move it over
to be even with sub-sub#1 and NOT the background. The first container
shown below is the sub-container that sits under main container #3. That
is our holding container.
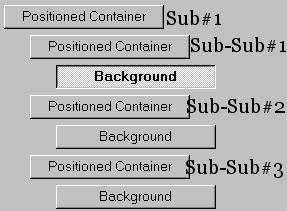
14. Edit sub-sub#2 to be 6 from the left horizontally.
15. Paste another sub-sub after first clicking on the
last object entered, which is the background for sub-sub#2. Move it over
even with the other sub-sub's.
16. Edit this one to be 12 from the left horizontally.
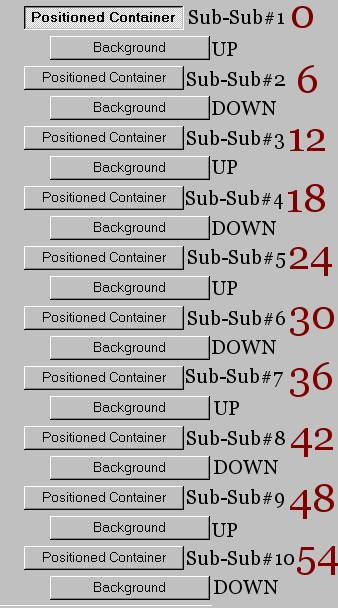
17. There are a total of 10 of these
sub-sub-containers. For each one, increase the amount of the distance
from the left by 6. The last one will be 54.
18. Sub-Sub#1 has a background that scrolls up.
Make #2 down, #3 up, #4 down, #5 up, #6down, #7up, #8down, #9up and #10 down.
This image shows you how the sub-sub-containers all go, what
their distances from the left are, and whether their backgrounds scroll up or
down.
19. Now, go to the sub-container of #3 main and copy
it. Click on the background of sub-sub#10 and paste it there. Move
the top positioned container you just pasted over to the left until it's
sub-containers are even with these shown above. That means the
sub-container itself will be slightly over to the left of where these are
showing. If you put it all the way over at the left, it won't work
right. You could click on the main#3 container and paste it there but I
don't recommend it. Placement here is critical. Once you get this
second segment of containers in the right place, go to each sub-sub container
that you just pasted in and change it from left to right
for the horizontal setting. These are your scrolling lines on the right.
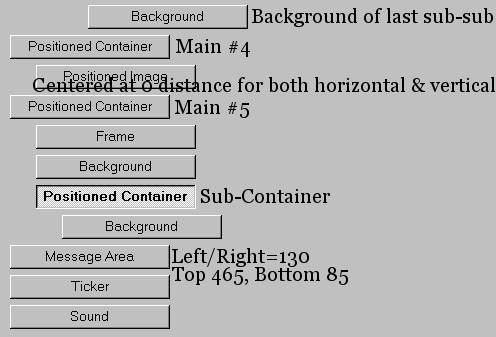
20. Click on the very last background and then insert a
positioned container. Move this all the way over to the left so that it
becomes main container #4. The settings for this container
are: horizontal is centered at a distance of 0, with a size of 'same as
largest contained image'. Vertical is set from the top with a distance
of 80 pixels and the size is 'same as largest contained image'.
21. Click on main container #4 above and then insert a
positioned image. This image is called dream2.jpg and it is your main
image. The settings are used at default, that is, they are both centered
and left at 0.
22. Now we are going to insert another positioned
container. This will be main container #5 and it will hold the
graphics for our text area. Click on the last item inserted and insert
the positioned container, then move it over to the left margin. Set the
left and right edges to 120. Set the top edge to 450 and the bottom edge
to 70.
23. Next, select main container #5 and then insert a
frame. This needs to be a double frame of 12 pixels, placed over the
background. Use the color #55415C.
24. Now we need a background for this container, and you
should use the one called dreambg-pink-shiny.jpg. Scroll this up+right,
30 pixels per second, 1 pixel per move, fast scroll. All of our
scrolling backgrounds need to be set at fast scroll.
25. Click on the background which you just inserted and
put in another positioned container. This one should fall right under
the background which is the correct place for it to be. Set all of the
edges to 10.
26. Insert a background under this subcontainer, use the
graphic called dreambg-pink1.jpg.
27. As shown above, we insert the message area next and
this is at the very left margin. The settings are left&right at 130,
top at 465 and bottom is 85. The text color is #55415C and the text has
been centered. To do that, select your text and click on the center icon
at the top of your scrippy.  The base color for the scrollbar is #55415C.
28. Next, insert your ticker and then insert your
sound. The one used for this lesson is called onbendedknee.mid. It
is set to play continuously.
29. Now, if you would like to use a loading message,
return to the top and check 'use loading message', then change the background
color, add some text or a graphic!
30. You are all done!

Tutorial created by Ozmee, November
2001. Redone 03/01/02.
©Copyright Ozmee. All rights reserved.
No portion of any page and it's contents at http://scrippyme.tripod.com
may be used for the purpose of profit. All tutorials may be saved to a
home computer and/or printed out if desired.
