|
Page Two
12. Click on the main background and insert three
positioned containers. Now under each positioned container insert four
positioned scrolls. Each one of these containers should be even with the
left border and not under any other container.
13. Set the first positioned container to be 5 pixels
from all edges.
14. Set the second positioned container to be 10 pixels
from all edges.
15. Set the third positioned container to be 10 pixels
from all edges.
16. Under the first positioned container and for the
first positioned scroll, hereinafter called simply PS, click on it and make
the image agt.jpg. The settings are vertical, up, 10, 1, smooth scroll
and from the left. As you should have some experience by now doing
Scrippy stationery, you should realize that these settings are default
settings other than the left direction.
17. For the second PS, use agw.jpg. The settings
are horizontal, right and from the top with default numbers.
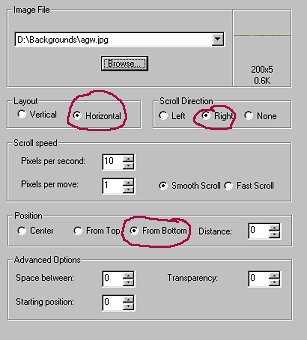
18. For the third PS, use agw.jpg. The settings
are horizontal, right and from the bottom. In case someone doesn't
understand those instructions, here is an image to show you what I mean.
19. For the fourth PS we are going to use agt.jpg
again. This one is vertical, up and from the left.
NOTE: What we are doing here is making frames
using these images. You can tell where to put them when doing your
own. Vertical will be either up or down and from the left or the right.
20. Click on the second positioned container with
the next set of PS's that need to be set. For the first one of these,
use agw.jpg. Set this to horizontal, left and from the top. Use a
distance of 25.
21. The second PS uses the agt.jpg.
This one is vertical, down and from the left. Set the distance to 10.
22. Click on the third PS. Using agt.jpg set it
vertical, down and from the right. and set the distance to 10.
23. For the fourth PS, use the agw.jpg graphic and
choose horizontal. Make this from the right and from the top. Make
the distance 25.
24. For the third set of four positioned scrolls,
click on the first one and use AGT, vertical, up, left and make the distance
25.
25. Second PS uses agt.jpg, vertical, up, from the right
and make the distance 25.
26. The third PS uses agw.jpg, is horizontal, left and
from the bottom with a distance of 10.
27. And finally the fourth PS uses agw.jpg, is
horizontal, right, from the bottom with a distance of 25.
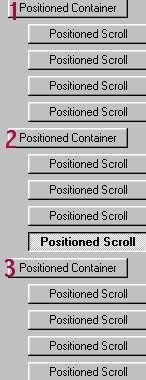
Please check your master scrippy against this image to make sure yours looks
just like this one.
Index - Next |

