|
1. Start a new scrippy ssc by clicking on the white
paper icon or choose File/New.
2. Insert a background. It is called hbdaybunney.
It does not scroll.
3. Insert a positioned container. Set it to center
and give it a size of 200. For vertical, set it to 110 from the top with
a size of 100. 200x100 is the size of the heart graphic and that is why
it needs to be set at that size. If you do this using your own graphics,
be sure to change the size to match your own graphic size.
4. Now insert a container under this first one.
Set it to center, size of 1 for horizontal. For vertical, choose to set
the top and bottom margins to zero.
5. Now add in a background and use the gold graphic
provided. Scroll this down at 30 pixels per second, fast scroll
selected.
6. Now copy the second container that has the background
in it and paste it six times, for a total of seven containers with
backgrounds. On the second background, scroll it up. The third is
down, fourth is up, fifth is down, sixth is up. For the horizontal
settings, container two is 30, three is -30, four is 60, five is -60, six is
90, seven is -90. These are the lines that go down from our object.
7. Insert your ticker, sound and loading message.
Choose one of your own sounds.
8. Insert a positioned image. This is called hbheart-l.
Center this at 275. Vertical is from the top at 250.
9. Insert another positioned image. This is called
hbheart-r. Center this at -275 for horizontal and vertical is still set
at 250.
10. Now we are going to make one set of containers that
we will copy so this won't take as long to make. Insert a positioned
container. This is a new set, so it goes all the way over to the left
and does not fall under a previous container. Set all edges to 0 except
set it 5 from the top.
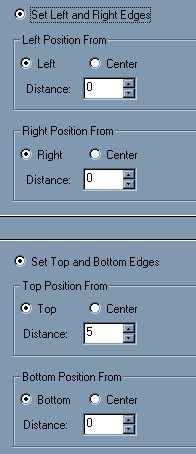
11. Insert a container under the last one. Set the
left and right edges to 0. For vertical, set this 5 from the top with a
size of 1.
12. Insert the gold background and scroll this left at
30 pixels, fast scroll.
13. Copy the container with the background and paste it
four times, making sure that these containers are even with the one you just
copied. Their settings are: (I started at 2 since you just did #1)
Container #2, Vertical is 10 from the top, scroll it right.
Container #3, Vertical is 15 from the top, scroll it left.
Container #4, Vertical is 20 from the top, scroll it right.
Container #5, Vertical is 25 from the top, scroll it left.
14. To make things move quicker, copy that entire last
set of containers starting with the one from #10 up above. Paste it four
times!
For each subcontainer, add 5 to the top margin and adjust the
scroll direction. Make sure NOT to change the first container of each
set. The last container should be 105.
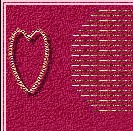
15. Now we will insert the left and right images with
the gold hearts. These images were created to make the shape that you
see on the end of the main object. By cutting out a shape we can make
the ends of our containers be any shape that we'd like! The first image
shows you the end result. The second two are the actual gif's we are
going to use. In order to make your own images, I'm going to give directions
for that at the very end of this tutorial.
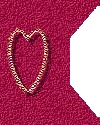 
Insert a positioned container, horizontal is set to left, 0
and size of 100, vertical is set to top, 0 and size of 125. 100x125 is
the size of the two gifs above. Insert a background under that and
insert the graphic called al2-l.gif. Non-scrolling.
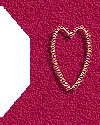
16. Insert another positioned container next, it doesn't
go under the last one but over to the left. Use the same settings as
above, but change it to be from the right and use the graphic called al2-r.gif
for the background under that one. Take a look. It's basically
working now.
17. Next I put in a double frame of 5 pixels, placed
over the background and I used color #FCCDDD.
18. Put in another positioned container, make it
centered, distance of 0 and size of 400 for horizontal. For vertical set
it to top, distance 200 and size 200.
19. Next insert a positioned image, and use the graphic
called hbframe2.gif. This is centered.
20. Under this same container put in a message
area. In here you will put the image called hvd-oz.jpg BUT you need to
make your own up using the same sizes as that one is to avoid
scrollbars. If you don't want to put anything here, then leave it
out. But then your gold graphic will just be blank inside. It's up
to you. The gold graphic can be left off as well. Instead you
could just put in a message area. You could put an image inside of that
frame, its really up to you. If you elect to leave off the frame and
message area under it, put in your own message area, try left and right
margins of 100 and place it far enough down from the top to avoid the top
image.
That is all there is to this, I hope you didn't have any
problems with this tutorial!
Tutorial Index |
