|
Simple Slide
So, you would like to make a
slider stationery? Great! You've come to the right place! Click
here
to see the finished product and here
to download a zip file with all of the needed parts including the
ssc file.
1. Open Scrippy and click on File/New or click
the white paper icon. Go to File and select Save As.
Save this as lesson13.ssc. Be sure to save after each change
to your stationery.
2. Insert a loading message, and for now check
where it says to use a loading message, because we don't want this
bothering us right now when we do a preview. At the end of
this lesson you may go back and check it again if you wish to use a
loading message.
3. Insert a ticker. Enter any text here
that you like and if you are not familiar with the different
effects, now is a good time to try them all out!
4. Insert a sound. We are using the one
called puppy.mid which is set for continuous play. You may use
this or any other sound in your collection.
5. Now we will insert a background and the one for
this lesson is called bluezig.jpg. It does not need to scroll.
6. Next we will insert a double frame of 12 pixels
placed over the background. The color to use here is #B9DFF4.
7. Now we will insert three containers. Go
ahead and insert one now. For the left and right margins please
use 95. For the top margin, use 45 and for the bottom margin use
25.
8. We will need a background here, so go ahead and
insert one and use the graphic called bluezig-light.jpg. It
doesn't scroll either.
9. Put in a frame, 10 pixels, double style and
placed over the background using the color of #0B3146. Now do it
again! Copy the frame by going to Edit, copy frame and then back
to edit and paste frame.
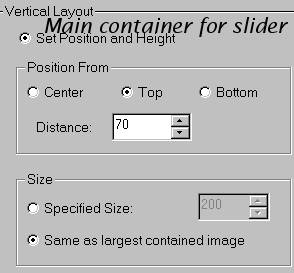
10. The next container is for our first set of
scrolls. So go on and put one in now. This goes to the left
margin and not under anything else. By that I simply mean it is a
main container and won't go below and to the right of any other
container. Set this at center and minus 97, and same as largest
contained image. Vertical needs to be set at 70 from the top and
same as largest contained image. The -97 setting will change if
you use an image that is a different size than the one used here.
You will see what width your image is and use the half. If
your image is 300 wide, you would use 150 instead of 97, if it's 400
wide, use 200.
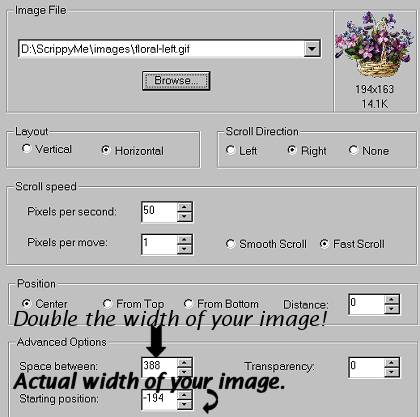
11. Insert a positioned scroll and use floral-left.gif.
The settings are horizontal and right. 50 pixels per second and 1
pixel per move, fast scroll. Position should be set to center
already so no change is needed there. The space between is
388. This is double the width of our images. The starting
position is minus 194. This is the actual width of our images.
The scroll direction is right! Notice that the left image goes
right and the right image goes left!
12. Copy and paste that scroll so it goes underneath
the first one. Change the image to floral-right.gif. Set it
to scroll left. No other changes are needed. This
is the first half of the slide, you may want to take a look at it and
see how this looks.
13. Now, if you would like, copy that last
positioned container and paste it under the first one so that it is even
with it. We will just make the appropriate changes. For the
horizontal setting change it to just be 97 from the center instead of
-97. A positive number puts the image that many pixels over to the
right of center. A negative number puts the image that many pixels
over to the left of center. This is why we have a positive and
negative number for the horizontal settings on this type of a
stationery. No other changes are needed in the container.
Now lets move on to the first positioned scroll and make
some changes. For this one, change the image to floral-right.gif
and set it to scroll left. Everything else is the same EXCEPT
remove the minus sign from down below!
In the second scroll, change the image to floral-left.gif
and set it to scroll right! Also remove the minus sign from the
bottom here. Those are the only changes necessary.
14. Go to Insert and choose message area. Set
the right and left margins to 100. For the top margin use
245. And for the bottom margin use 15.
15. That's it! Go and take a look at your
completed stationery! It wasn't so hard now was it?
Let's review a few things about sliders so that you can
easily make one using some other graphic. The positioned
containers for each set of scrolls needs to be centered and the distance
for one will be a negative number which is equal to half the width of
your graphic. The other one will be a positive number equal to
half the width of the graphic. The vertical setting is of no real
importance other than you should set it from the top. You can just
check 'same as largest contained image' or you can type in the size of
your height and width, either way works.
For the scrolls, if it scrolls left then use the right
facing image and vice versa. These should always be centered because we
used the center to determine sizing for our container. The space
between is always double the width of your image because we are using
two images. Makes sense doesn't it? And the starting
position is equal to the width of your image, with one again being
negative and one being positive. Keep the negatives together and
the positives together. And that is all there is to doing this
slider.
Please save your ssc again and then go to File/Export
Stationery and name the stationery Lesson13. When you submit this
to the group please give it the same name. That makes it a lot
easier for me when I need to help with the stationery.
Thanks! I hope you had an easy time of this.
 
Main Index - Tutorial Index
Copyright Ozmee 2001.
Contents of these pages may
be copied, printed, saved, or passed around. This lesson was updated
on 1/29/2002. |