|
Two Ladies
This is a stationery for beginners, however
anyone can do it! Click here to see the
finished product and here to download the zip file for
all of the necessary images and sound files.
Note: Placing something
"UNDER" means it goes below and to the right a little. All the
way over to the left is supposed to denote that this object does not go inside
of any container. Although this lesson was written while using Version 2
of Scrippy, it works just as well in Version 3.

1. Insert a background and use the
file bg-3.jpg

2. Insert a left container with the
specified size of 25 and place it 'over the background'.
3. Under that container, insert a
background using bg-1.jpg. Make it scroll up.
 4.
Insert a top container, specified size of 25 and place it over the background. 5.
Insert a background and use the bg-1.jpg, scroll this one right. 6.
Insert a right container, specified size of 25 and place it over the background. 7.
Next insert the background and use the bg-1.jpg. This one scrolls down. 8.
Insert a bottom container, size of 25 and place it over the background. 9.
Insert the background for the bottom container, use bg-1.jpg and scroll it left. 10.
Insert a frame of 5 pixels and make sure this goes all the way over to the left
margin. To make this easier, you can click on the main background
first. The color numbers are 128-0-0 or #800000 Make this frame outset. 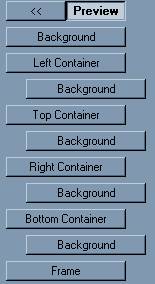
This is what your master scrippy should look like now. Check to make sure
that your scrippy looks like this one.
11.
Insert a positioned container by first clicking on the main background and then
insert it. Set the right and left edges at 110 pixels. Set the top
and bottom margins to 50. 12.
Insert under this a positioned image. Set it Centered and from the top at
0. 
13.
Insert another container, making sure that this one goes all the way over to the
left and does not sit under the previous container. Set the right and left edges to
110. Make it 375 from the top
and 50 from the bottom. 14.
Now insert a double frame of 10 pixels using the same color as before and place
this over the background. Next,
Insert an inset frame of 4 pixels using the same color as before. Both of these
frames should fall under the previous container. 15.
Insert your message area at the left edge and by itself, that is, not under the
last container. Left and right margins are 120. The top margin is
360 and the bottom margin is 40. 16.
Now insert a background and click on use selected color. The numbers are
240-208-79 or color code #F0D04F. This is a mustard yellow color chosen from the main
image. 17. A
positioned image goes next, all the way over to the left margin. Use the
image smbgl.jpg. Set this to be from the left and from the top at 0. 18.
Another positioned image is next. Use smbgr.jpg and this goes from the
right and from the top at 0. 19.
Our third positioned image is smbgl.jp and goes from the left and the bottom at
0. 20. Our last
positioned image is smbgr.jpg and is set from the bottom and the right at 0. 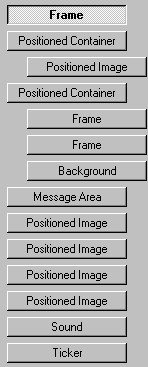
Look at your master scrippy and make sure that your objects are in the right
positions. If you do not put them exactly where they need to go, this stat
will not work properly in some instances, such as your message area.
21.
Insert the sound, a ticker and the loading message. The sound is called
ff7words.mid. CONGRATULATIONS!
YOU'RE DONE!
|
Main Index

|
Tutorials Index

|
This website and all content may be freely copied, reproduced or shared without
prior permission from the webmaster. All graphics represented here are
originals (other than the main stationery images) and all tutorials are provided by
Ozmee. This tutorial was updated 1/29/2002.
Created by Ozmee, October 13, 2001
|