|
 
To
view the completed stationery, click here. To download a zipped file with
all of the graphics and sound files, click here. The SSC file is NOT being
provided for this tutorial.
1.
Open up a new master scrippy. Insert a background and use the file named
elfbg.jpg as shown below. 
2.
Insert a second background and use ccl3.gif. Make this 70% transparent. 
4.
Insert a positioned container. For Horizontal set this to center, 0 and
specified size of 400. For vertical set this to 60 pixels from the top and
360 pixels from the bottom. 5. Under that positioned
container insert a second positioned container. Set this at center, -100
and same as largest contained image. For vertical set this to center, 0
and same as largest contained image. 6. Next insert a
positioned scroll. Use the graphic named evil-l.gif. Set this to
horizontal, right, 50 pixels per second and 1 pixel per move, fast scroll,
centered and the advanced options are space between 100, and starting position
-295. 
7.
Insert another positioned scroll and for this one use the graphic named
elf-l.gif. The settings are horizontal, left, 50 pixels per second, 1
pixel per move, fast scroll, centered, space between is 400 and starting
position of -100. 
8.
Click on the first positioned container and insert another one. This one
should be even with the second positioned container that was inserted.
Make this one centered, 100 and same as largest contained image. For
vertical set it to center, 0 and same as largest contained image. 9.
Insert a positioned scroll and use the graphic evil-r.gif. Set this
horizontal, left, 50 pixels per second and 1 pixel per move, fast scroll,
center. The advanced settings are centered, space between 100 and starting
position of 295. 
10.
Insert a second positioned scroll. Use the graphic elf-r.gif and the
settings are as follows: horizontal, right, 50, 1, fast scroll, centered,
space between 400 and starting position of 100. 
11. Click
on the first positioned container and insert a background. Again use the
elfbg.jpg. 12. Click again on the first positioned
container and insert a frame. Use style of groove and width of 6. The
color is 121-132-206. 13. Click on the first background and
insert a positioned container. This container goes all the way over to the
left margin. Horizontal settings are center, 0, size 44. Vertical is
335 from the top with a specified size of 36. 14. Insert a
frame of 4 pixels, style of groove using the same colors as before. 15.
Insert a background using the image coffeecup.gif. Click on layer with
other objects. 
16.
Insert another background and use the elfbg.jpg again. 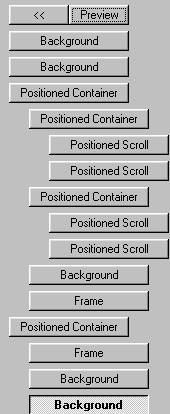
This is what you should have now. Check your master scrippy against this.
17.
Click on the main background and insert another positioned container. Make
sure this one is also flush with the left edge. Set this center, 0 and
size 44. For vertical set this top, 50 and size of 36. 18.
Insert a grooved frame, 4 pixels wide and use the same color as before. 19.
Insert a background and use the elfbg.jpg as before. 20.
Insert a second background and use the graphic coffeecup.gif. 21.
Now insert a sound. Use the midi named galwypipr(1).gif. 22.
Insert a loading message and set the time for 1.0. Use any graphic here
that you would like! Or just put in some text. 23.
Insert a positioned container. This goes flush against the left
margin. Set the left and right margins to 100. Set the top margin to
375 and the bottom margin to 50. 24. Insert your message
area. All margins are set to 10. 25. The very last
thing to do is to insert a ticker. Type anything in that you would like. CONGRATULATIONS!
YOU'RE DONE! I hope you have enjoyed this tutorial and that
your stationery looks great! After you have done this one, why not find
two images and make your own! Make each image a gif with a transparent
background and mirror it for left and right. Have fun with it! INDEX
- TUTORIALS
All
graphics for the kaleidoscope are the intellectual property of their
owners. The graphics used for this tutorial (backgrounds) are free for use
without prior approval. This tutorial created by Ozmee, October 28, 2001.
|
