To preview this stationery click here.
To download a zipped file with the graphics shown here, the ssc and the sound
file, please click here.
This SSC file was provided by Kathie to me as a gift and permission was given
to use it for this tutorial.
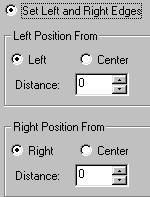
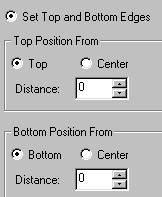
1. Insert a positioned container and set all of the
edges to 0.
2. Insert a background and use vasebg2.jpg. Scroll
this up+left but make no other changes.
3. Insert a positioned container, make sure this is not
under the last one, it goes all the way over to the left margin. Set all
of these edges to 5. It is done the same way as in Step #1 but just
change the numbers all to 5.
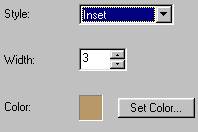
4. Insert a frame under the last container. Make it
inset, size 3 and the color is 184-152-104. Save this color for later
use as a favorite.
5. Insert a background and use the greenbg1.jpg.
This scrolls up+right with no other changes necessary.
6. Insert a third positioned container and set all of
the edges to be 35. Refer to step #1 to see how this is done.
7. Insert a frame exactly as done in step #4.
8. Insert a background, use the graphic vasebg4.jpg and
scroll this up+left with no other changes needed.
9. Insert another positioned container and set all of
these margins to be 65. Refer to step #1 for how this is done.
10. Insert a frame exactly as done in step #4.
11. Insert a background. Use vasebg2.jpg and
scroll this up+right.
12. Insert another positioned container and set all of
the margins to be 95.
13. Insert a frame exactly as before.
14. Insert a background and use vasebg4.jpg.
Scroll this left+up.
15. Insert another positioned container. Set all
the edges of this one to be 125. Refer to step #1 if you need help with
this.
16. Insert another frame exactly as before.
17. Insert a background using vasebg2.jpg, scroll it
up+right.
18. Insert another positioned container and set all
margins to 155.
19. Insert the frame as before.
20. Insert a background and use vasebg4.jpg, scrolled
up+left.
21. This will be the last positioned container for this
set. Set all of the margins to be 185.
22. Insert a frame as before.
23. Insert a background, use vasebg6.jpg.
Non-scrolling.
24. Next insert a message area and set all of the
margins to be 200. This will be an expanding message area.
25. Next insert a loading message. Use a graphic,
animation or just type in some text here. If you'd like to have a
graphical background in the loading message, please refer to the Scrippy Tips
& Tricks available via the main menu.
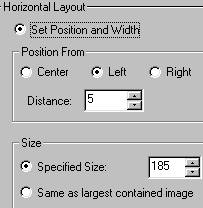
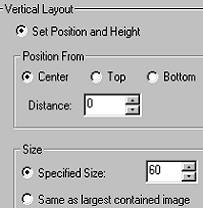
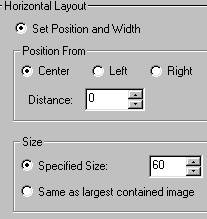
26. Insert a positioned container. Use settings as
shown below.
27. Insert a frame exactly as done before, inset, size
3.
28. Insert a background and use vasebg2.jpg.
Scroll this right.
29. Insert another positioned container and using the
graphics from step #26 as a guide, make these the same EXCEPT make the
horizontal say right instead of left.
30. Insert the usual frame exactly as done before.
31. Insert a background and use vasebg2. Scroll
this one left.
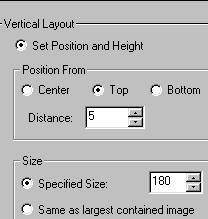
32. Now insert another positioned container. Use
the settings as shown.
33. Insert a frame as before and then insert a
background as before, using the vasebg2 and scroll it down.
34. Insert the last positioned container. Use the
images from step #32 to guide you and use the exact same numbers. The
ONLY change is that for the vertical layout, change it from top to bottom.
35. Now insert another frame under this container and it
is the same as before, width of 3 and style is inset, same color as before.
36. Insert a background, use the vasebg2 and scroll it
up. No other changes are needed.
37. Insert a sound. Use the file Fields of Gold
included in your zipped file.
This completes your stationery! Feel free to use your
own graphics :-) Thanks to Kathie for allowing us the use of her ssc for
this tutorial.
Created by Ozmee,
November 2001. This tutorial may be freely copied. Graphics shown
on this page were created by me and may be
snagged or reused at will. I place no restrictions of any kind on any
image I create unless otherwise stated.
|